Advanced
Flux Redux
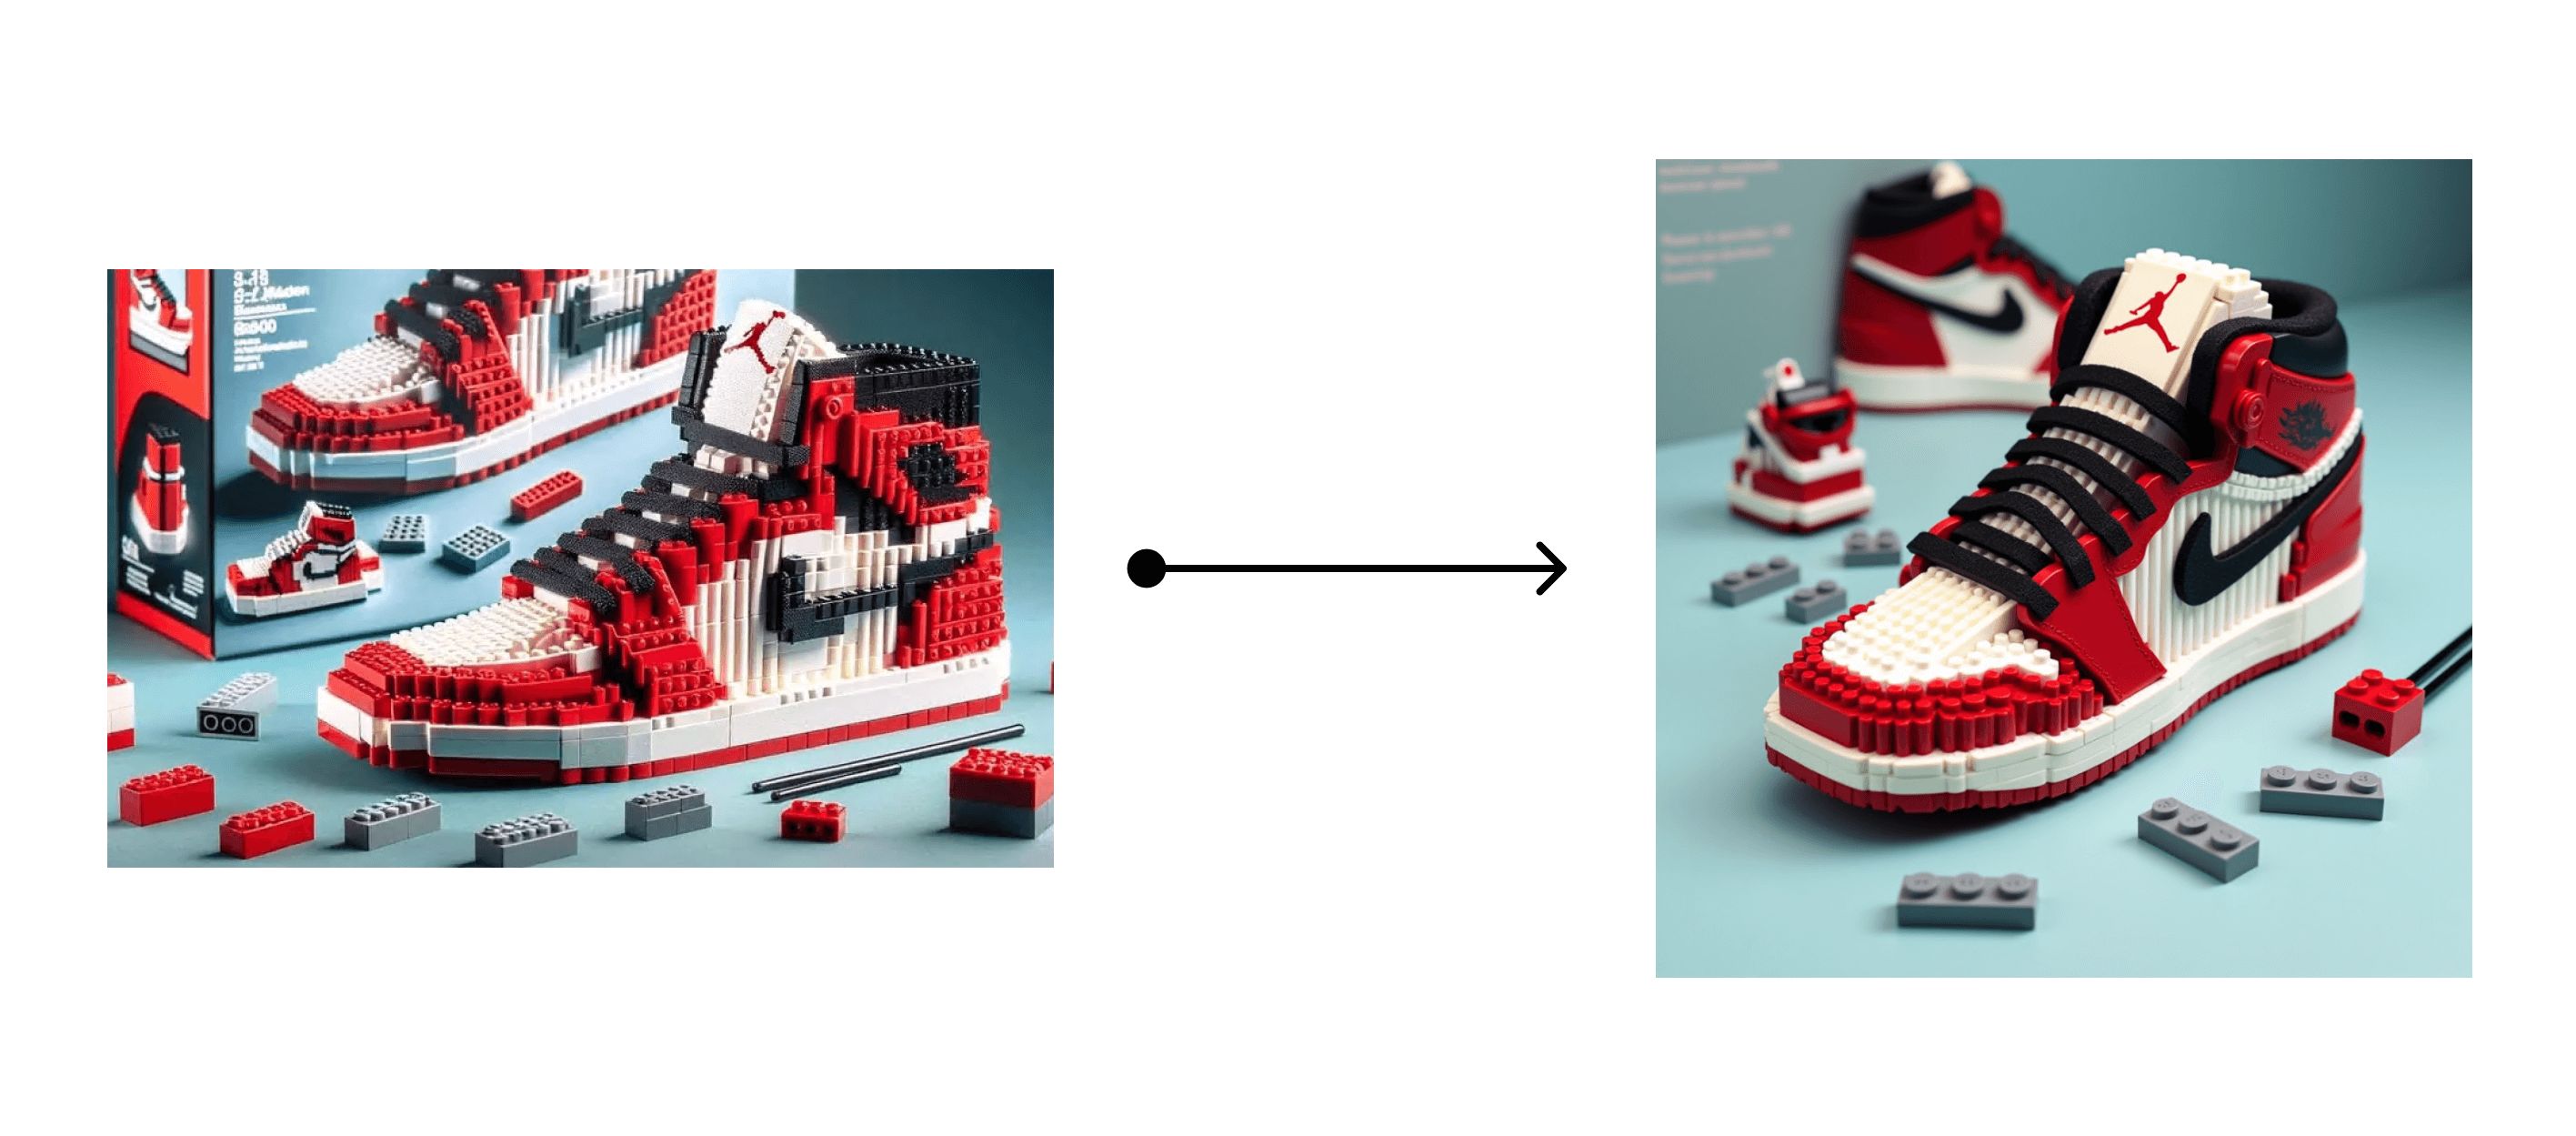
In this chapter, we will introduce how to use Flux Redux to generate similar images.

This image is generated by AI
1. Download Flux Redux Model
First, you need to download the Flux Redux model. You need to go to here to download the Flux Redux dev model, and place it in the/models/style_models directory. Note that it is the style_models directory, not the diffusion_models directory.
In addition to this model, you also need to download a model named sigclip_vision_patch14_384. This model is used by Flux to convert images to Conditioning. You need to go to here to download this model, and place it in the /models/clip_vision directory.
2. Flux Redux Basic Workflow
2.1 Single Image Variation
Download the model, and then we will build the Flux Redux ComfyUI workflow. If you don’t want to manually connect, you can download this workflow template from Comflowy and import it into your local ComfyUI. (If you don’t know how to download Comflowy templates, you can refer to this tutorial.)Flux ComfyUI Workflow Template
Click the Remix button in the upper right corner to enter the ComfyUI workflow mode.
Apply Style Model node (Figure ①). Then this node’s output is Conditioning, so it needs to be connected to the BasicGuider node.
Then the Apply Style Model node has the following input nodes:
- Conditioning: As I mentioned earlier, Redux inputs the Prompt and image together to Conditioning, so this Conditioning needs to be connected to the CLIP-based FluxGuidance node.
- Style Model: This is to connect the Flux Redux model. Double-click the blank area, search for the
Load Style Modelnode (Figure ②), then add it to the workflow, and then connect it to theApply Style Modelnode, and select the Flux Redux model we downloaded earlier. - Clip_vision_output: Search for the
Clip Vision Encodenode (Figure ③), then add it to the workflow, and then connect it to theLoad CLIP Visionnode (Figure ④) and theLoad Imagenode (Figure ⑤).
Here, note that the
Clip Vision Encode node in Figure ③ has an additional crop parameter. What does this mean? It crops your image, and then only encodes the cropped image. If you choose Center, it means it will crop the center part of the image. Why is it necessary to crop? Because the Redux model can only receive square images. So your input image should be square, otherwise, the generated image may not contain all the elements in the image.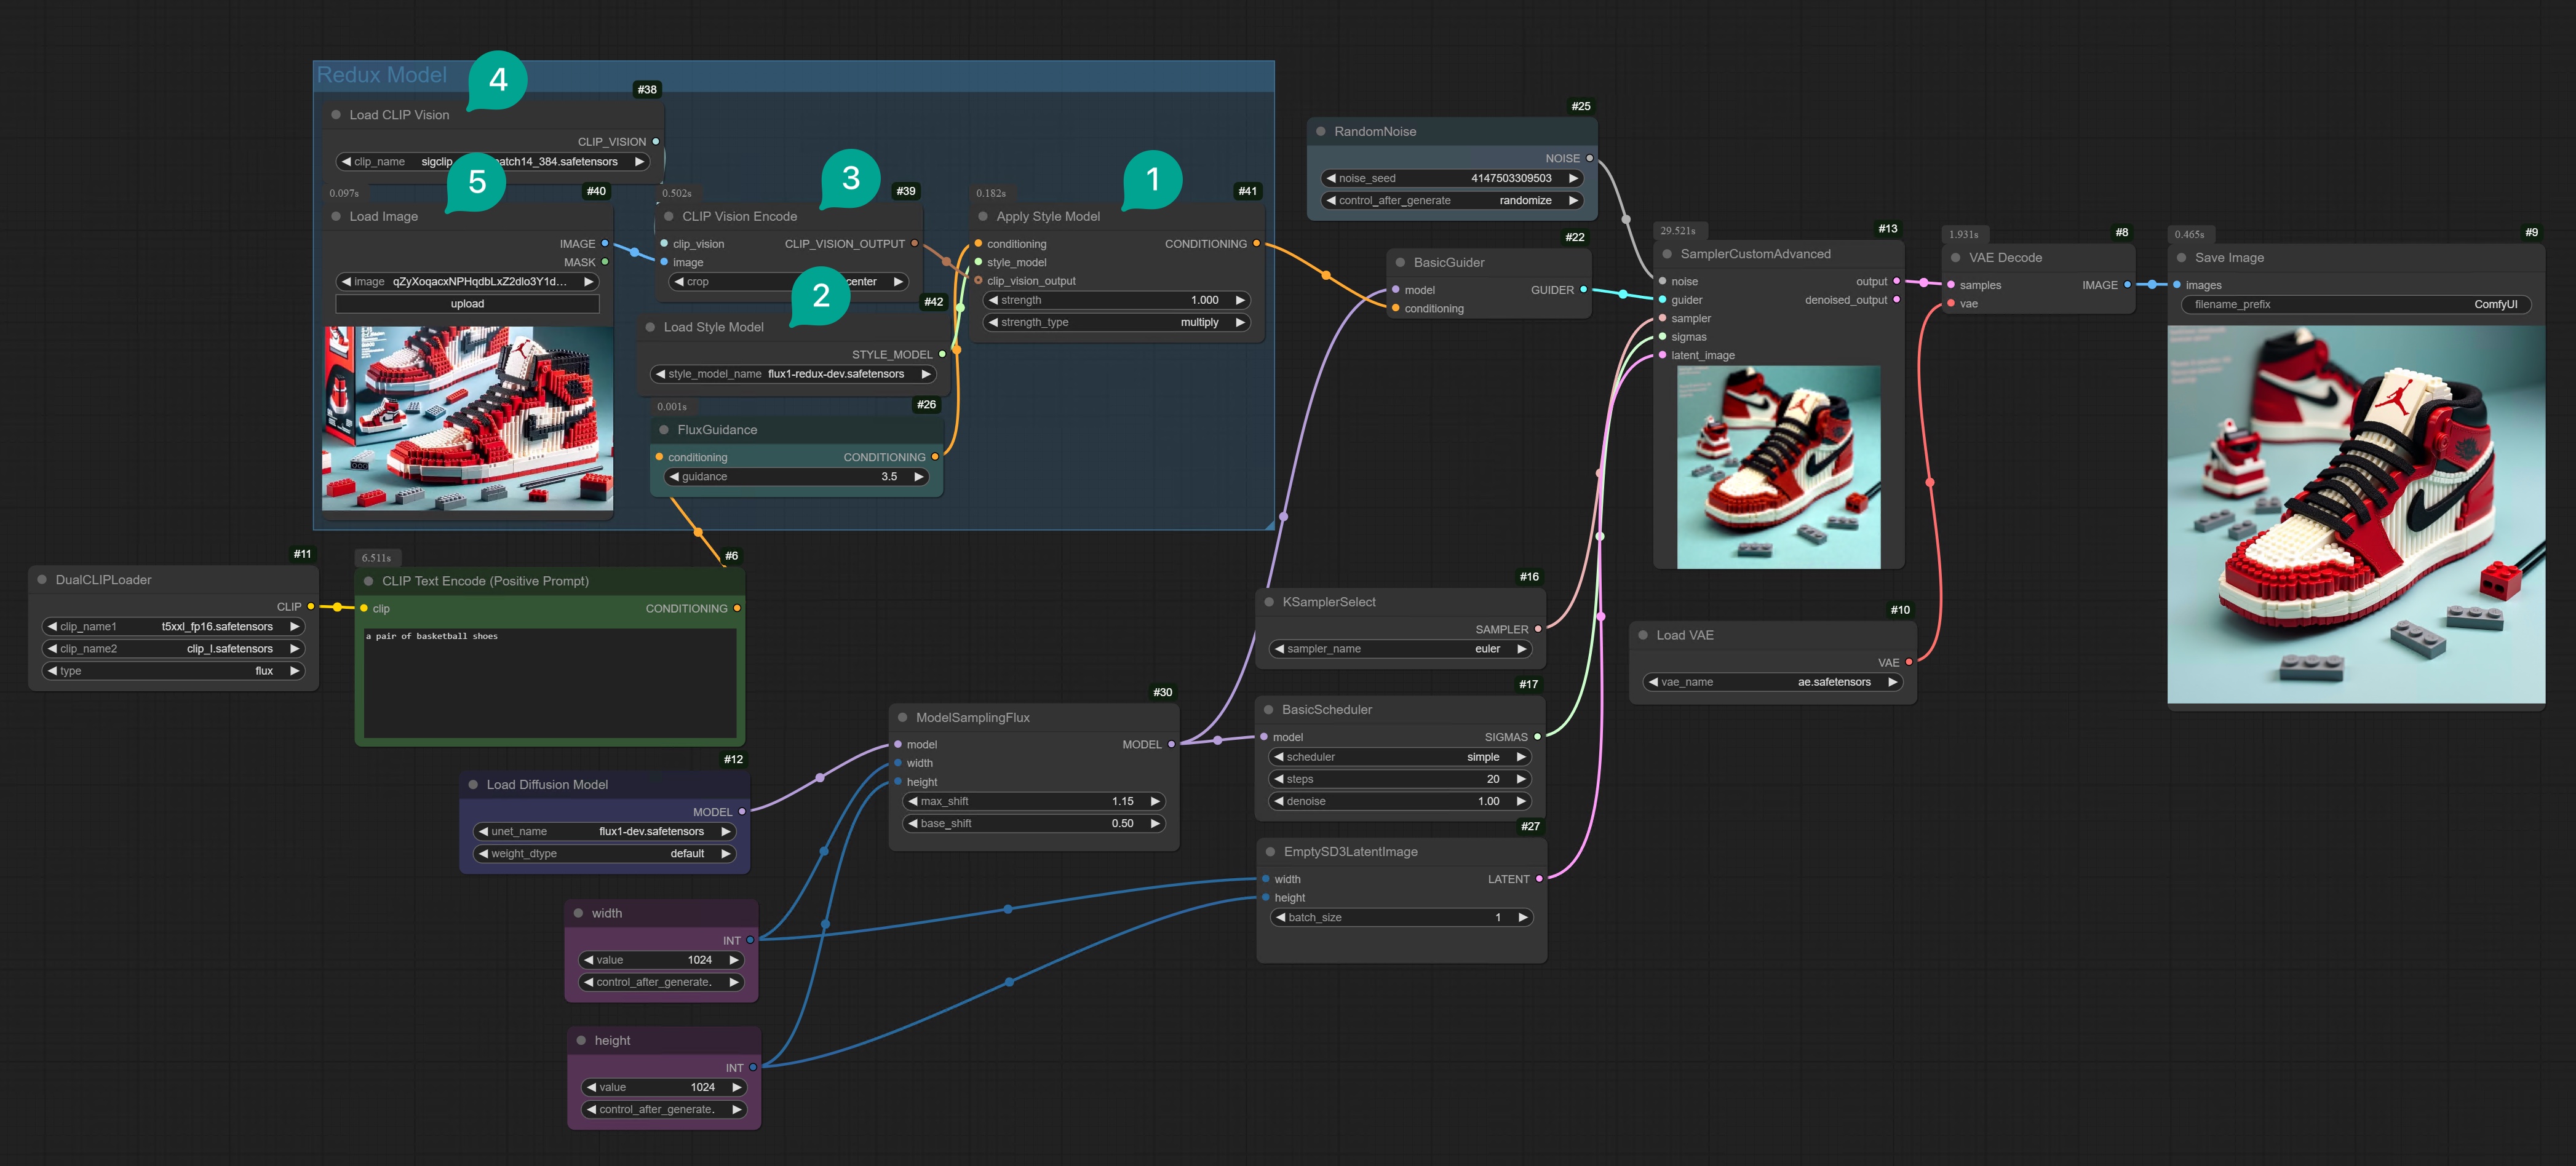
sigclip_vision_patch14_384 model to convert the image to Vision (simply understood as a set of word vectors), then using the Redux model to convert the Vision data to Conditioning (simply understood as converted to a vector that Flux can understand), then inputting it together with the Prompt to the Flux Redux model, and finally inputting the output of the Flux Redux model and the original image to the Flux model to generate the image.
You can simply understand this process as using the Flux Redux model as a translator. It translates the various elements in the image into Conditioning data that Flux can understand, and then inputs it into the Flux model to generate the image.
2.2 Two Images Fusion
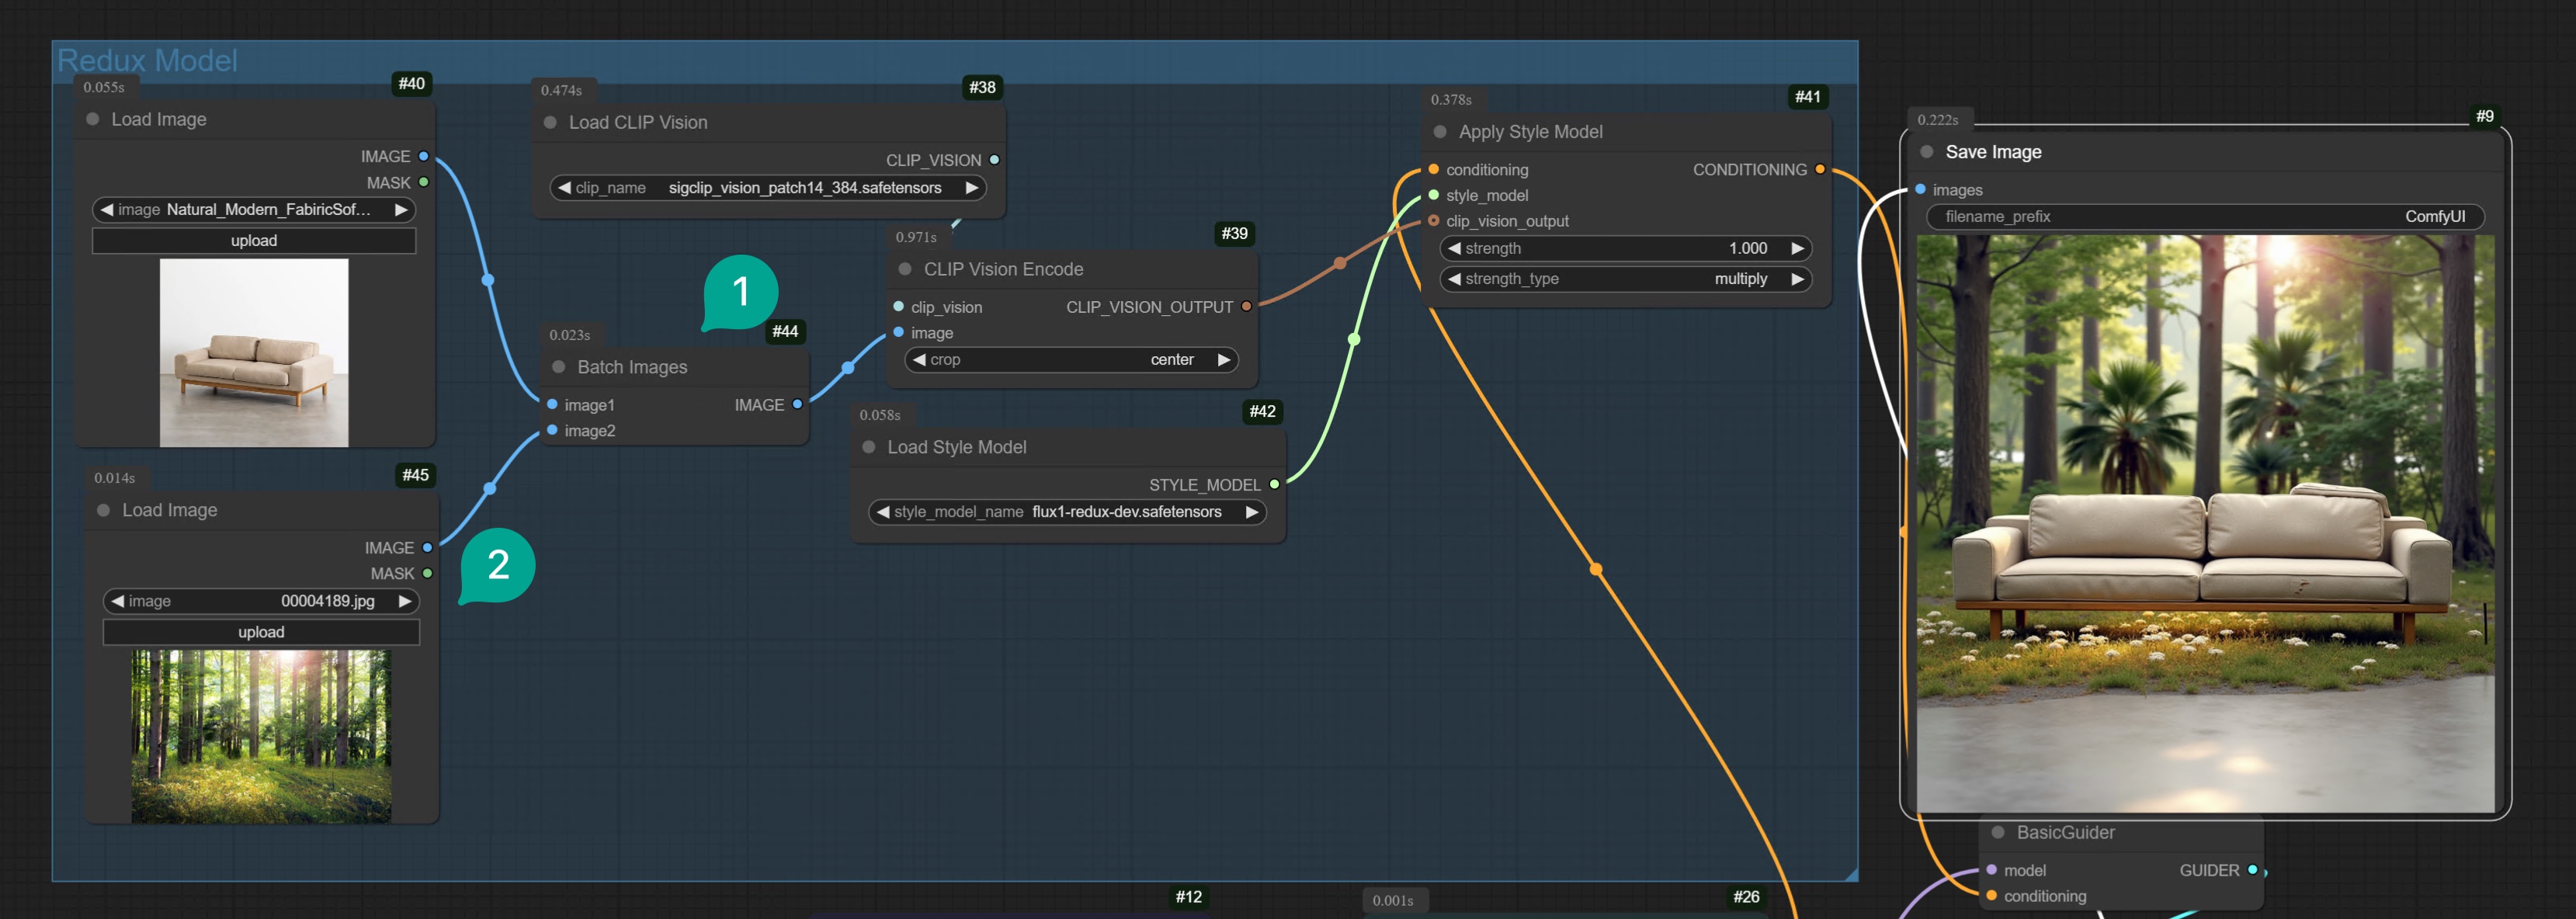
In addition to using a single image to generate variations, you can also try to fuse two images through the Redux model. Based on the above workflow, we only need to add aBatch Images node (Figure ①), and then connect it to the second Load Image node (Figure ②).
Then select the two images you want to fuse, for example, I fused a sofa and a forest image together, and you will get a very interesting image.
Flux ComfyUI Workflow Template
Click the Remix button in the upper right corner to enter the ComfyUI workflow mode.
3. Flux Redux API Workflow
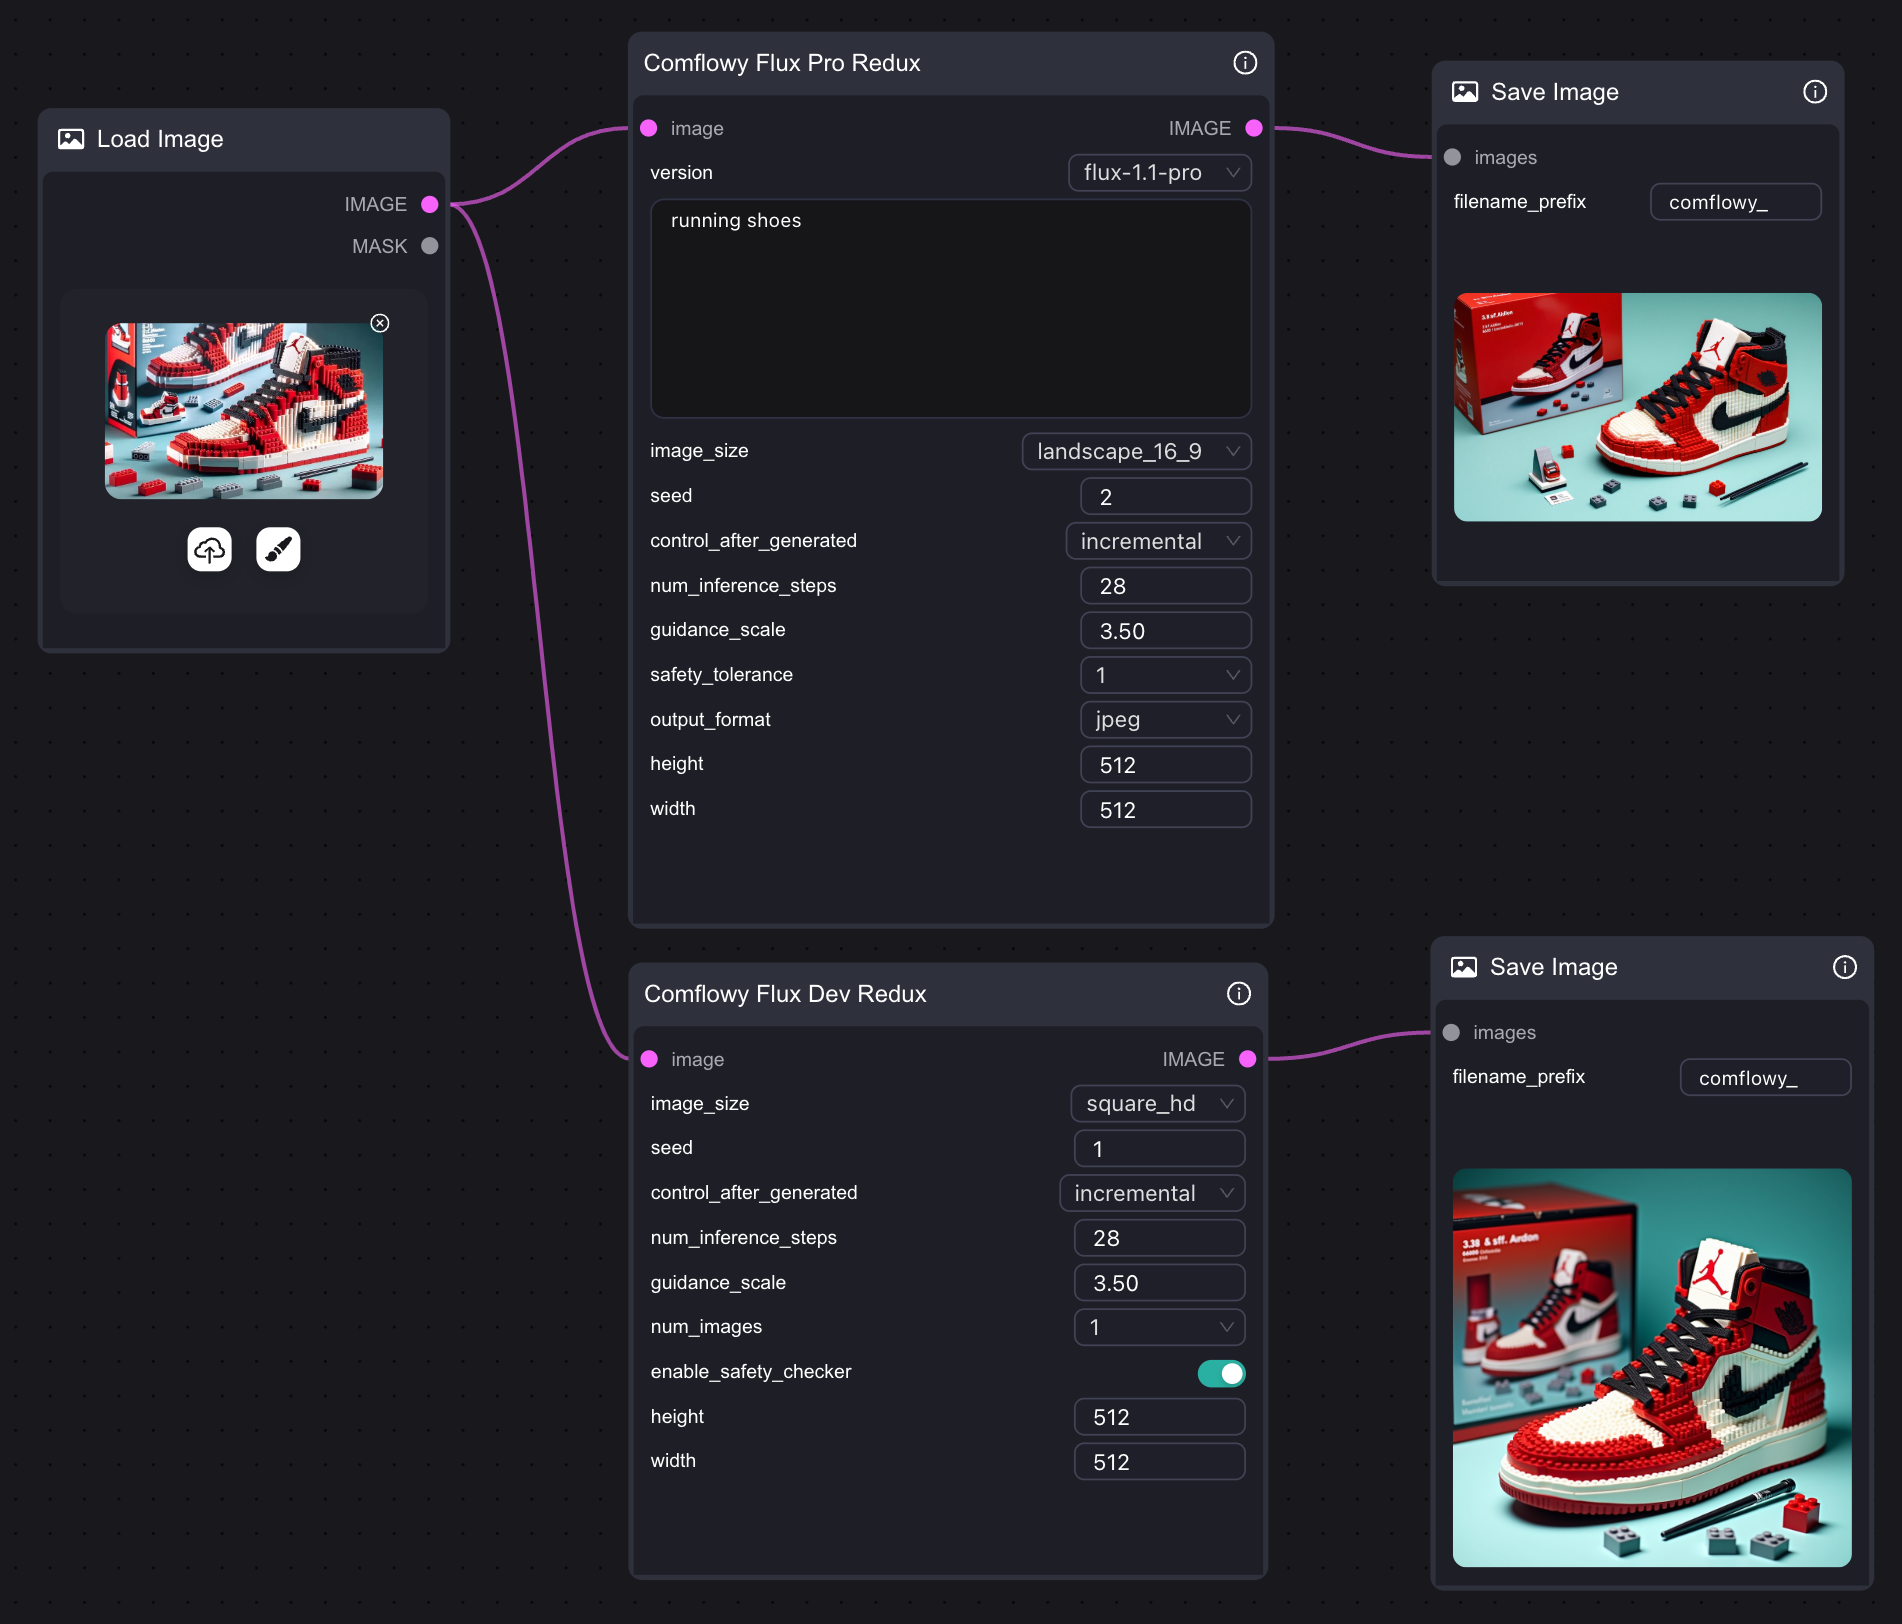
If your computer performance is not sufficient to run the Flux Redux model, you can also try using Comflowy’s Redux API node in ComfyUI. Of course, you can also directly use the Flux Redux API node in Comflowy, with a simple connection method that requires just one node, and it also supports Flux Pro and Dev versions.Note that since this node uses an API, you will need to pay the corresponding fees when using it.
4. Reduce Flux Redux Weight
When using the above workflow, you may find that the weight of the Prompt is extremely low, and you basically cannot change the content or style of the image through the Prompt. What is the reason? As mentioned earlier, the Flux Redux model is like a translator. It translates the various elements in the image into Conditioning data that Flux can understand, and then inputs it into the Flux model to generate the image. These translated data will be added to your Prompt. However, because your Prompt is usually very short, usually 255 or 512 tokens. In contrast, the Redux’s Prompt for your Text is 729 tokens. This is probably 3 times the length of your original Prompt. So if you want to control the content or style of the image more through the Prompt, what should you do? There are two methods:- Reduce the weight of Redux, or shorten the length of the Redux Prompt.
- Increase the weight of Text, or increase the length of your Prompt.
4.1 Reduce Redux Weight via Extension
First, let’s talk about the first method. To solve this problem, an open-source developer has developed this extension, allowing you to better control the Redux model. You can install this extension via ComfyUI Manager, or via Git Clone. For detailed installation methods, please refer to Install ComfyUI Extension article. After installing the plugin, you only need to modify the Redux node group in the workflow:- Remove the
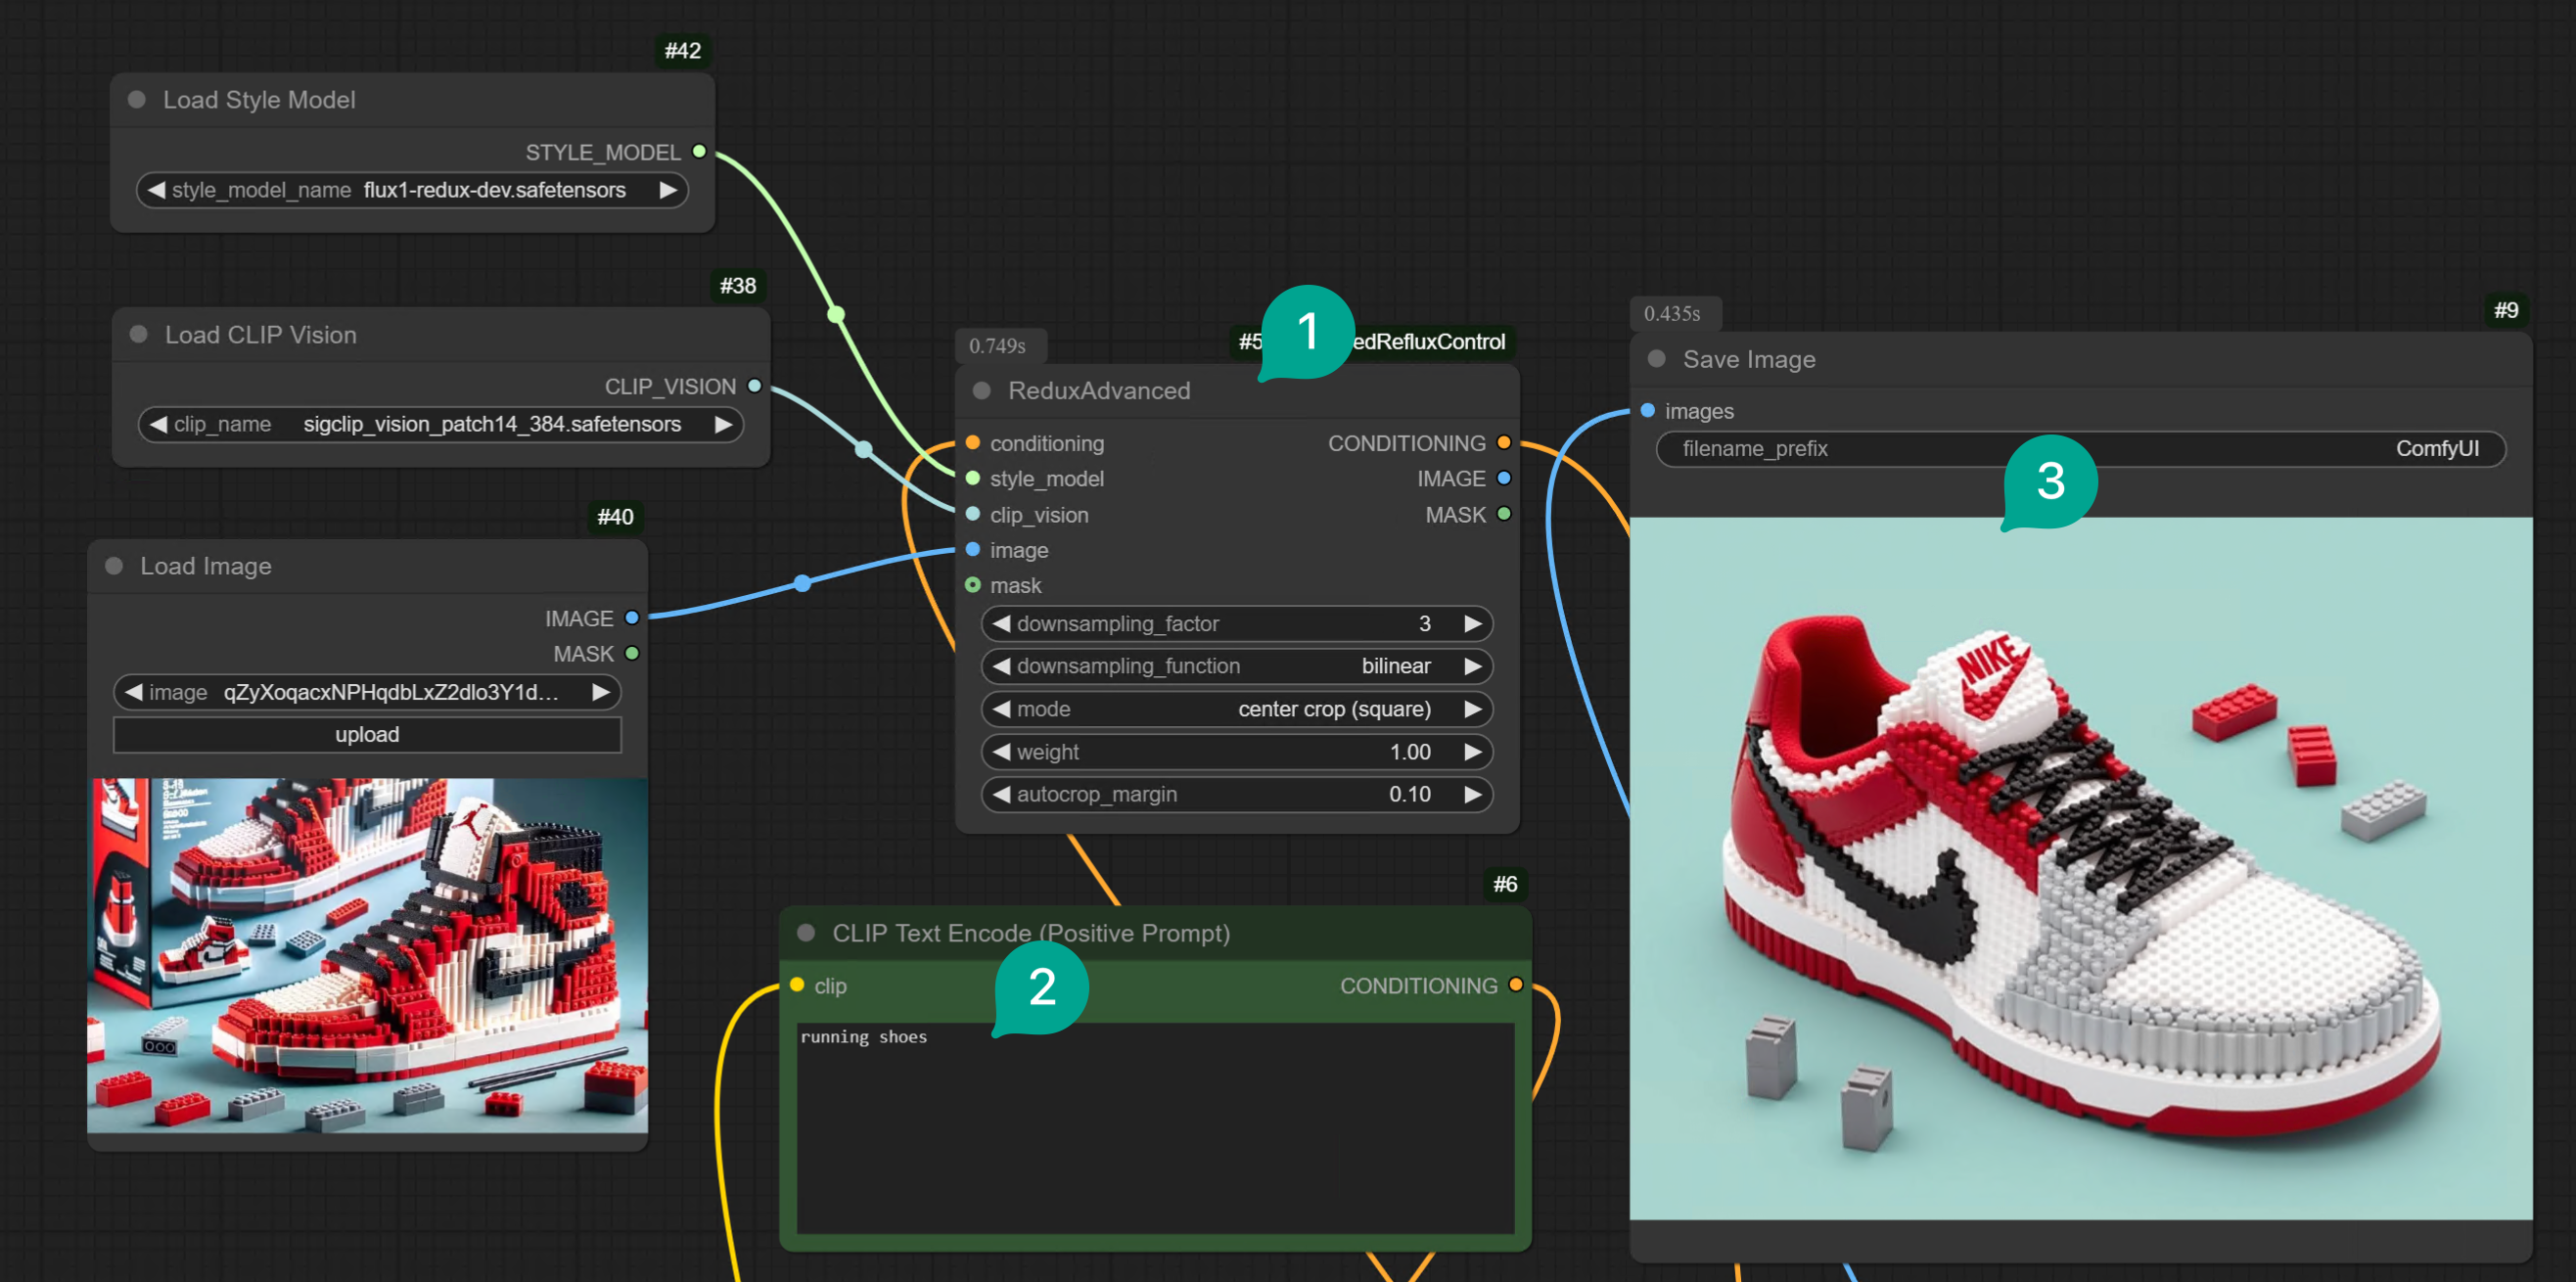
Apply Style Modelnode. Replace it with theRedux Advancednode in Figure ①. - Modify the Text Prompt.
- Finally, you will get an image similar to the input image, but with the content controlled by the Text Prompt. For example, in the following case, it converted a Lego-style basketball shoe into a Lego-style running shoe.
- You need to adjust the
downsampling_factorparameter of theRedux Advancednode in Figure ①. The larger the value, the lower the weight of the Image Prompt. 3 is roughly medium strength. You can test the effect of different values according to your situation. - In addition to adjusting the
downsampling_factorparameter, you can also adjust thedownsampling_functionparameter. You can switch to different parameters to try.
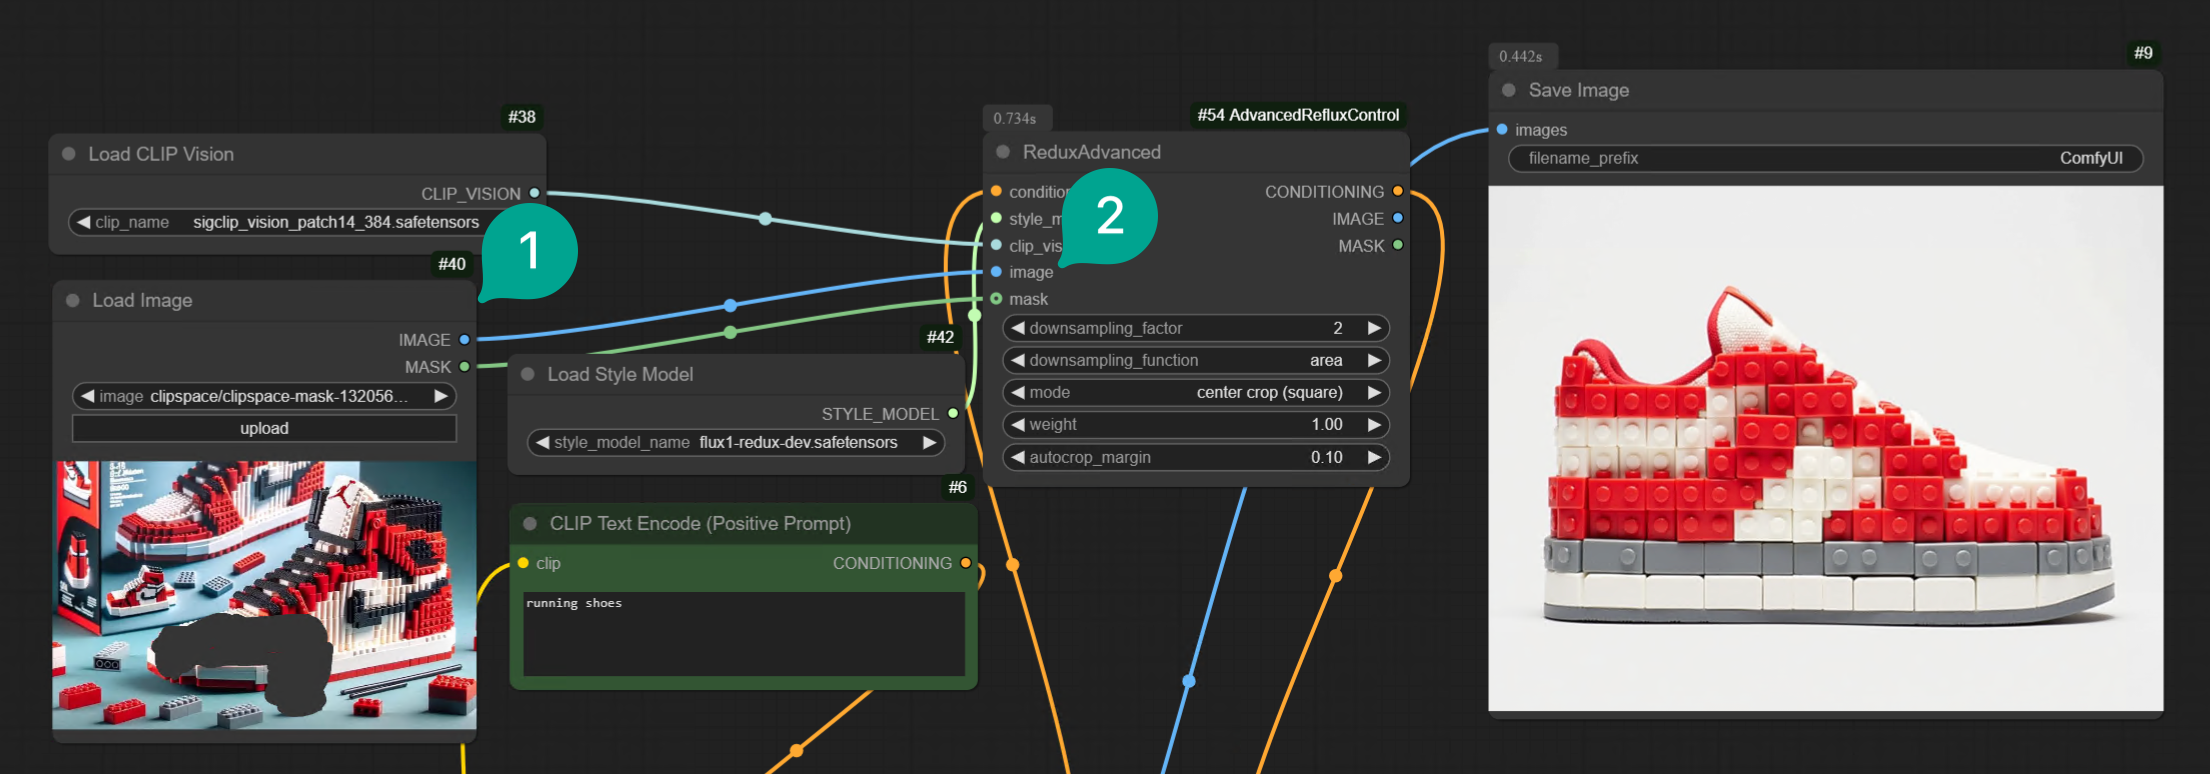
Mask terminal of the Load Image node to the Mask terminal of the Redux Advanced node, and then circle some areas:
4.2 Increase Text Prompt Weight
Next, let’s talk about the second method, increasing the weight of Text, or increasing the length of your Text Prompt. The workflow is as follows:
| Figure | Description |
|---|---|
| ① | I added a ConditioningSetTimestepRange node, and then for better distinction, I named it Prompt Conditioning. Then connect it to the FluxGuidance node. And set start to 0, end to 0.1. This means that during the final generation process, the proportion of Text Prompt will reach 10%. If you want the Prompt weight to be higher, you can set the end value to be larger. |
| ② | Add another ConditioningSetTimestepRange node, and then for better distinction, I named it Image Conditioning. Then connect it to the Apply Style Model node. And set start to 0.1, end to 1. This means that during the final generation process, the proportion of Image Conditioning will reach 90%. Note that the start value here must be greater than the end value of Prompt Conditioning. |
| ③ | Add a Conditioning Combine node, then connect it to the Prompt Conditioning and Image Conditioning nodes. Note that Prompt Conditioning is the first input. |
| ④ | Then I filled in “running shoes” in the Text Prompt. |
| ⑤ | The generated image is mainly running shoes, but the style is still the Lego style of the input image. |
Note that whether the final generated image meets your needs depends on how you allocate the proportions of
Prompt Conditioning and Image Conditioning. You can adjust them according to your needs.

