
This image is generated by AI
This chapter mainly introduces how to use Flux model in ComfyUI. If you are not familiar with ComfyUI, you can first read the ComfyUI 101 tutorial.
- Full version of Flux:This version of Flux model file does not contain Text Encoder and VAE model, so you need to download other models. And this method is suitable for users with more than 24GB of VRAM and more than 32GB of memory. However, using this method will get the best image quality.
- ComfyUI official supported FP8 version of Flux:This version of Flux model file contains Text Encoder and VAE model, so you can use it directly in Checkpoint. And this method is suitable for users with less than 24GB of VRAM. But the image quality of this version of Flux is worse than the full version.
- GGUF version:This version is contributed by the open source community developers, and is also to use Flux model on small VRAM devices. So the developers converted Flux model to GGUF format. But the accuracy will not be lost too much as FP8. However, this method requires installing additional plugins.
- NF4 version:This version is similar to GGUF, also to use Flux model on small VRAM devices. But according to my experiments, NF4 is the least predictable version in terms of image quality. Sometimes, the image is very good, and sometimes it is very bad. I think it has consistency issues, so I don’t recommend using it.
1. Full version of Flux
1.1 Download Flux model
First, you need to download the necessary models to your local machine. First, the first step is to download the Flux model. You can go to HuggingFace to download FLUX.1-dev or FLUX.1-schnell model. Go to the FLUX.1-dev page, click theFiles and versions button (① in the figure), then click the Download button (② in the figure), download the model.
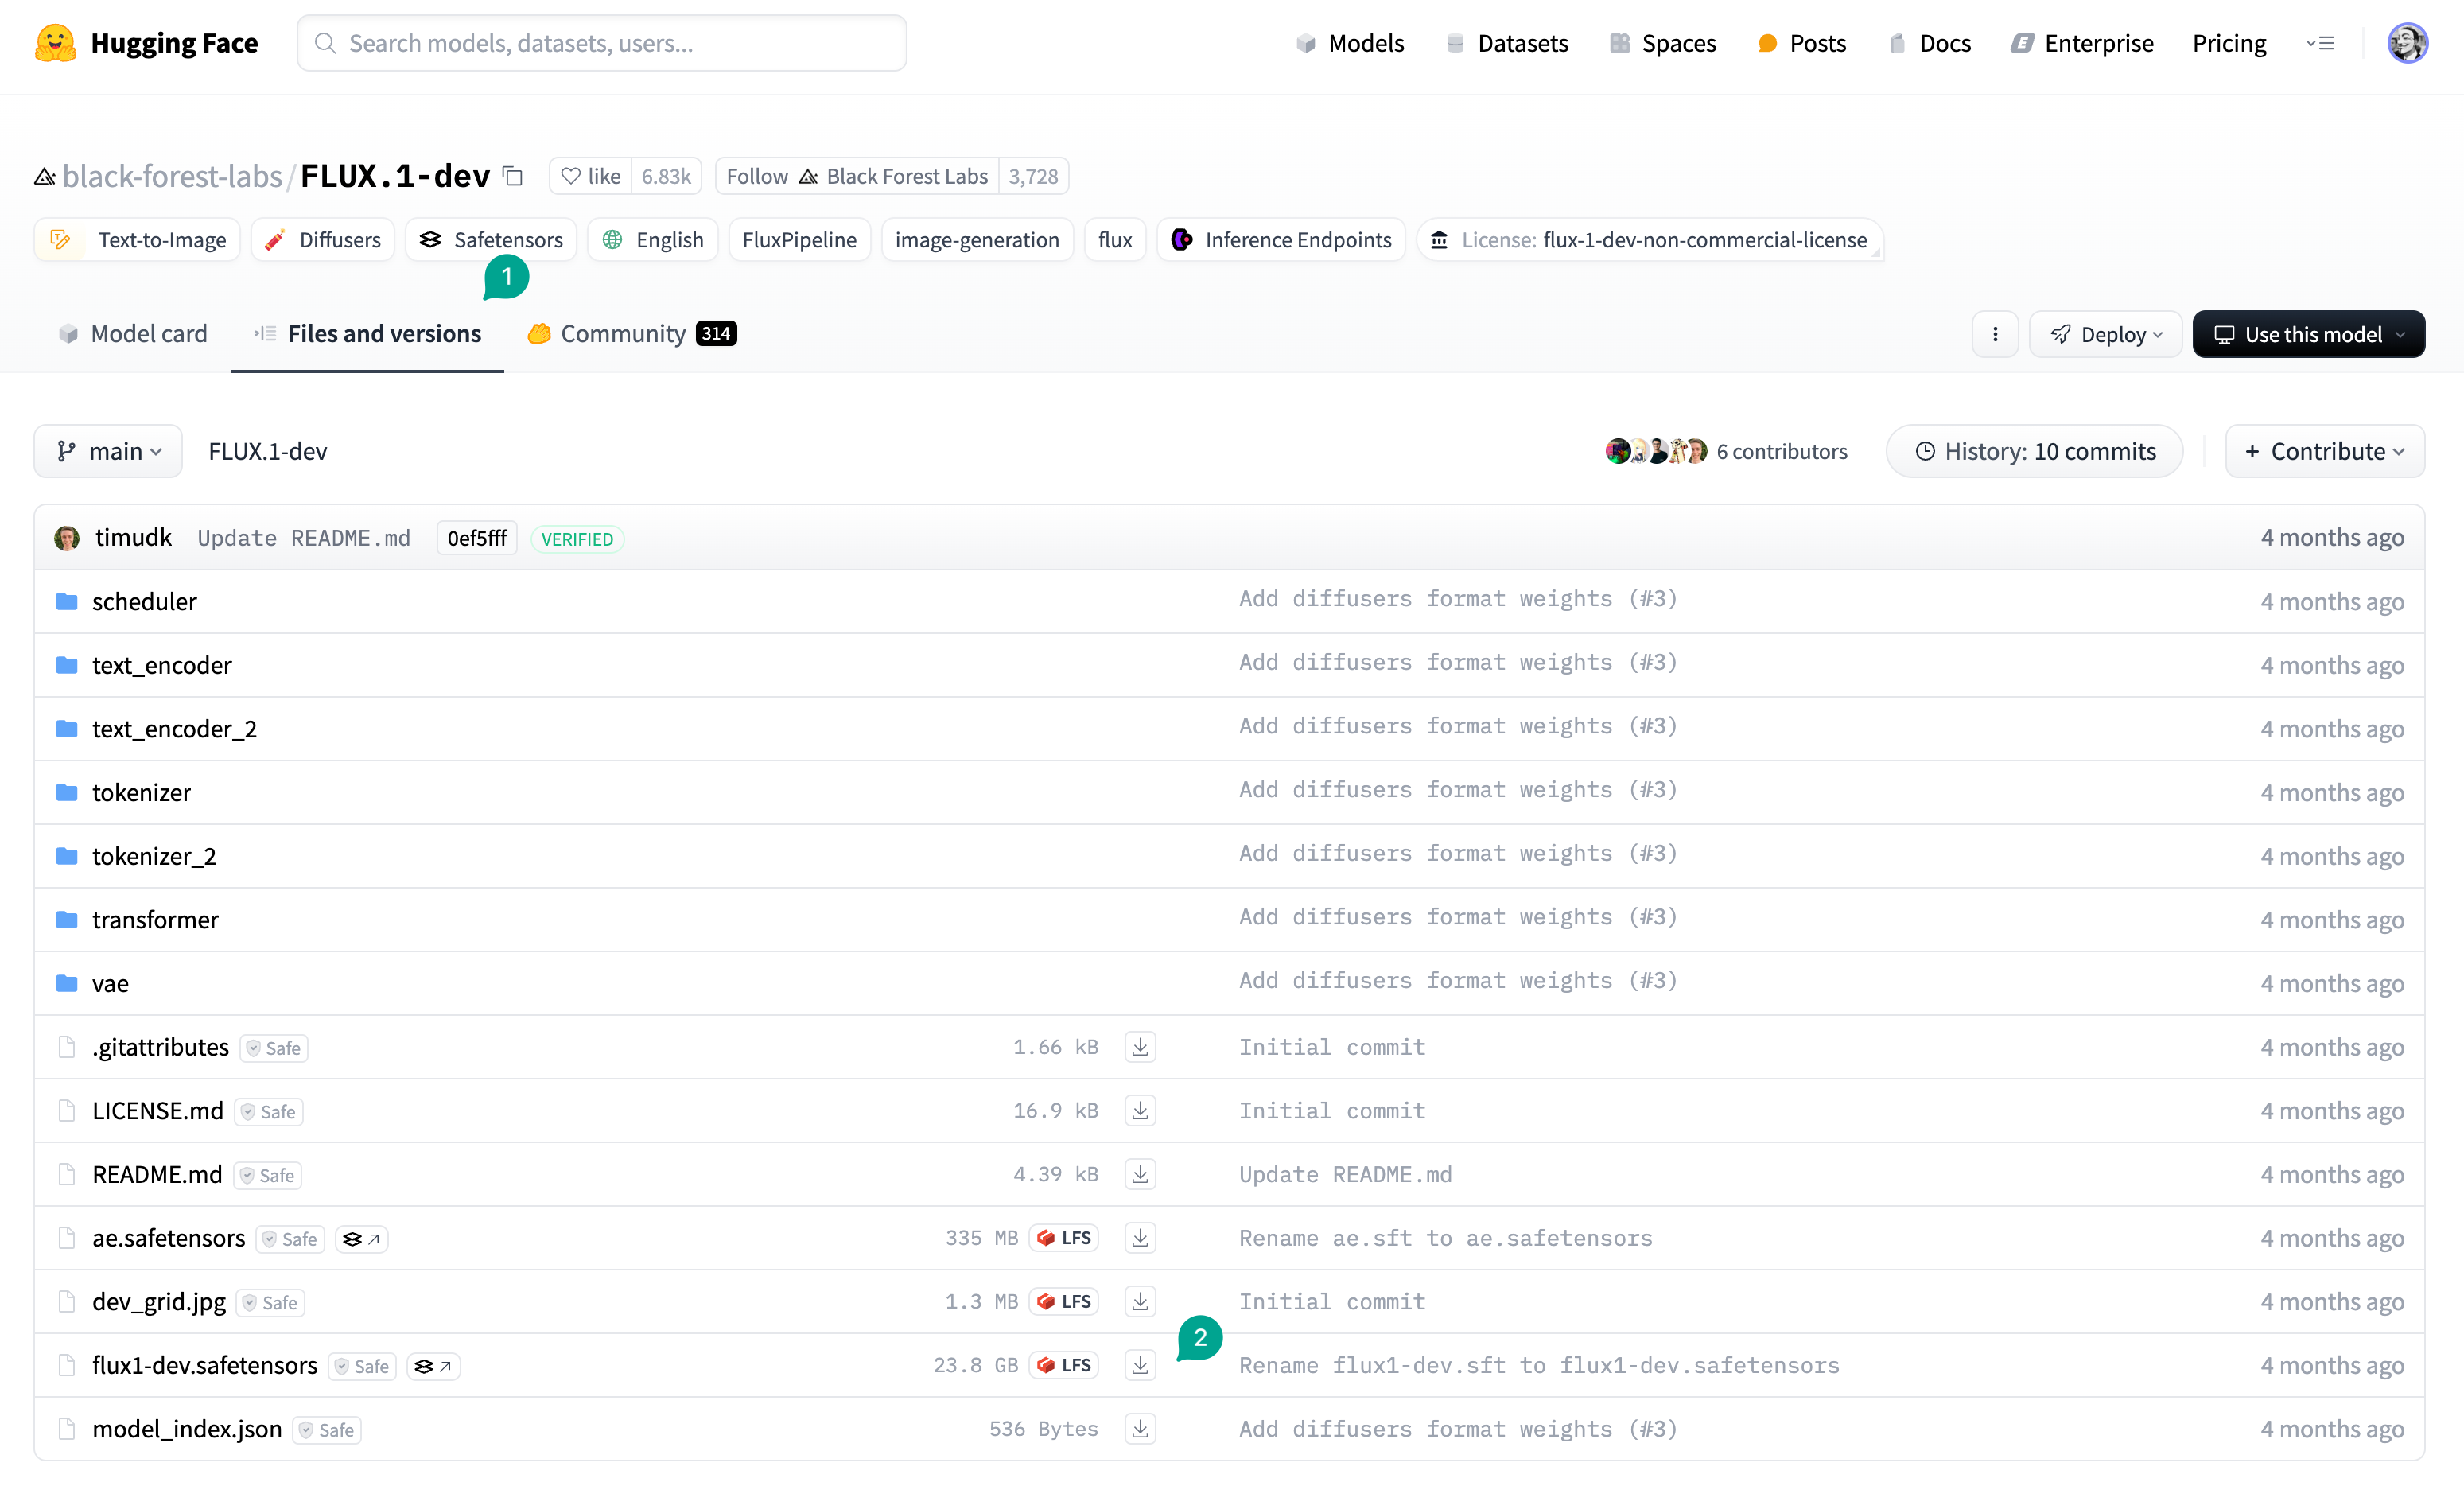
/models/diffusion_models/ directory of ComfyUI.
1.2 Download Text Encoder model
Next, you need to download the Text Encoder model. As I mentioned in the previous chapter, Flux uses two Text Encoder models. You need to go to here to download two models, one isclip_l.safetensors, another is t5xxl_fp16.safetensors:
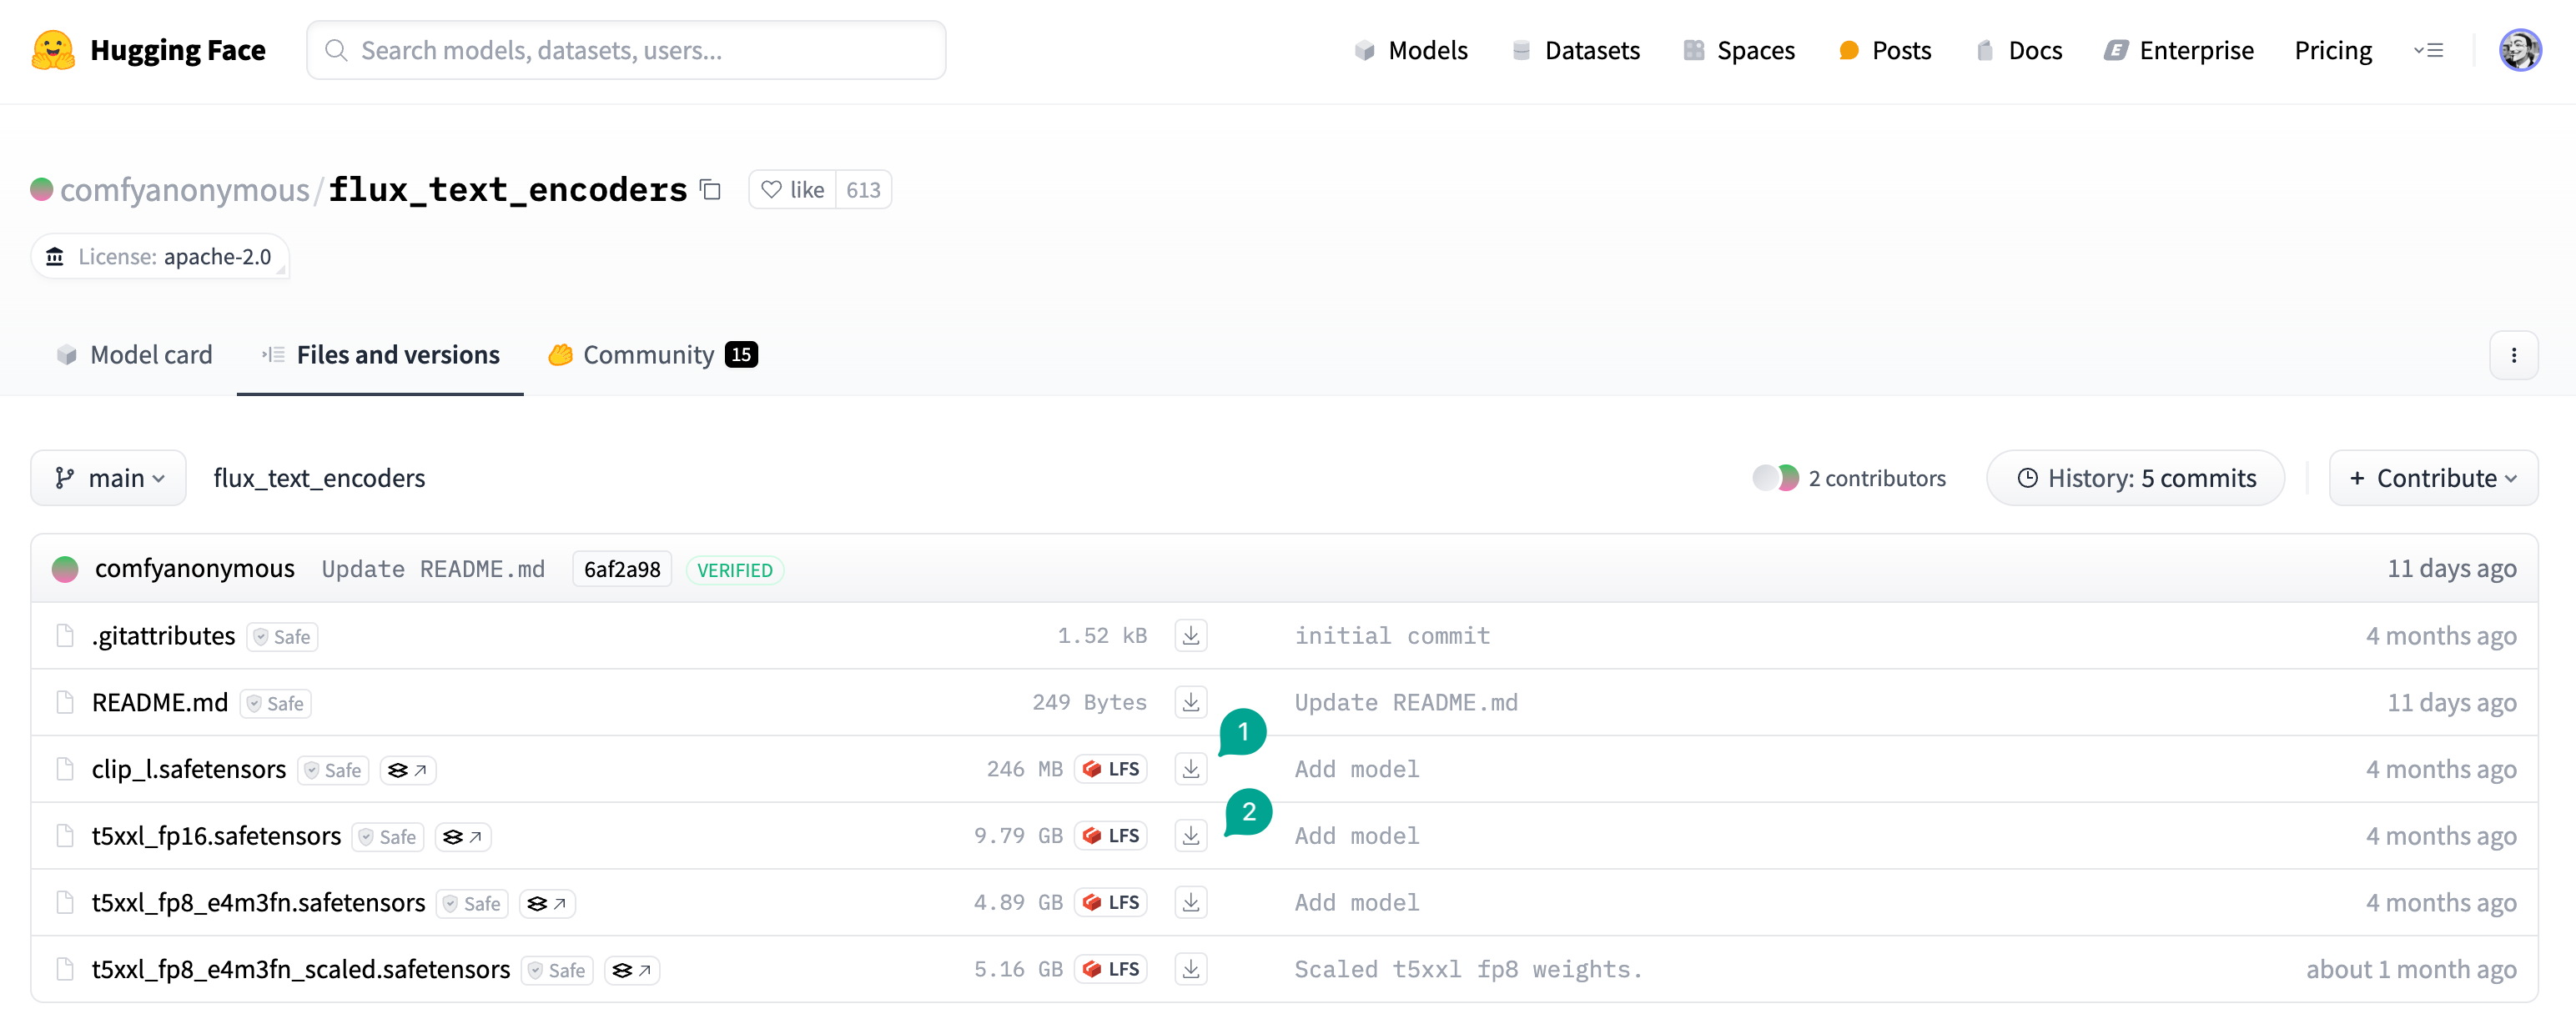
t5xxl_fp8_e4m3fn.safetensors model. Downloaded model needs to be placed in the /models/clip/ directory of ComfyUI.
1.3 Download VAE model
Finally, download the VAE model. You can go to here to download the model. Downloaded model needs to be placed in the/models/vae/ directory of ComfyUI.
1.4 Configure ComfyUI workflow
1.4.1 ComfyUI official recommended version
After downloading the model, you can start building the workflow. First, let’s introduce the full version workflow of Flux recommended by ComfyUI. You can refer to the following screenshot to connect the nodes yourself, manually connecting will help you understand the full workflow.
Flux Dev App
Use this application, generating a single image only takes 8s.
Flux ComfyUI Template
Click the Remix button in the upper right corner to enter the workflow mode.
| Figure | Description |
|---|---|
| ① | Load Diffusion Model node, used to load Flux model. Because the Flux model provided by Black Forest Labs does not contain Text Encoder and VAE model. So you can only use this node to load the model, and not use the Load Checkpoint node. |
| ② | The base shift in the ModelSamplingFlux node is a small and stable adjustment that can stabilize the image generation process, while the maximum shift is the maximum allowed change of the latent vector, which can prevent the output from extreme deviation. The combination of the two can achieve a balance between the stability and flexibility of image generation. If you increase the base shift, the generated image may become more consistent and closer to the expected form. But it may also lose some subtle details. Reducing the base shift can bring more changes, thus showing finer details or more subtle textures. However, this may also make the image less stable, and may appear slight artifacts or inconsistencies. Increasing the maximum shift allows the model to explore the potential space more freely, which may make the picture content more creative or more exaggerated interpretation. The final generated image may have more exaggerated features or more stylized appearance, but it may also be too far away from the real representation. Reducing the maximum shift will impose restrictions on the model, thus making the depiction of the picture more controllable and realistic. The image may remain close to the typical appearance, reduce unexpected changes, but may lack some creative elements or subtle uniqueness. If you want to make the image generated by Flux model more realistic, you can try to adjust the maximum shift to 0.5 and the base shift to 0.3. |
| ③ | The DualClipLoader node is used to load the Text Encoder model. As I mentioned in the previous chapter, Flux uses two Text Encoder models, so you need to use this node to load two models. One is clip_l.safetensors, the other is t5xxl_fp16.safetensors. Just select flux type. |
| ④ | The CLIP Text Encoder node is connected to the DualClipLoader node. This is the same CLIP Text Encoder node you use in the Stable Diffusion workflow. But there is a little difference here. There is no Negative Prompt node here. As I mentioned in the previous chapter, Flux is a guidance distilled model. So there is no Negative Prompt. |
| ⑤ | The Guidance node allows you to set the Guidance value from 0 to 100. The effect of this value is very subtle. You need to test it with different prompts. If you find that the image generated is not good, you can try to adjust it. After testing: 1. Even if this value is set to 90, the generated image is still usable. So you can try it without hesitation. 2. This value only has significant effects at specific values, such as 1, the generated image will be darker. 3. The effect changes greatly between 0~4. In other words, the difference between generating images by setting this value from 0 to 4 is much greater than setting it from 10 to 60. So if you want to test more effects, you only need to test from 0 to 4. 4. If you want to generate something that is very complex and does not exist in the real world, such as “tomato with legs”, then you need to set a larger value, such as 5 or more. 5. If you don’t know what to use, set it to 3.5. |
| ⑥ | The EmptySD3LatentImage node is used to generate latent vectors. Although it is named SD3, it can actually be used with Flux. |
| ⑦ | The VAEDecode node is used to decode latent vectors. Here, you need to use the VAE model you downloaded earlier. |
1.4.2 My recommended version
I think the official version of ComfyUI is a bit too complex, so I recommend a simplified version.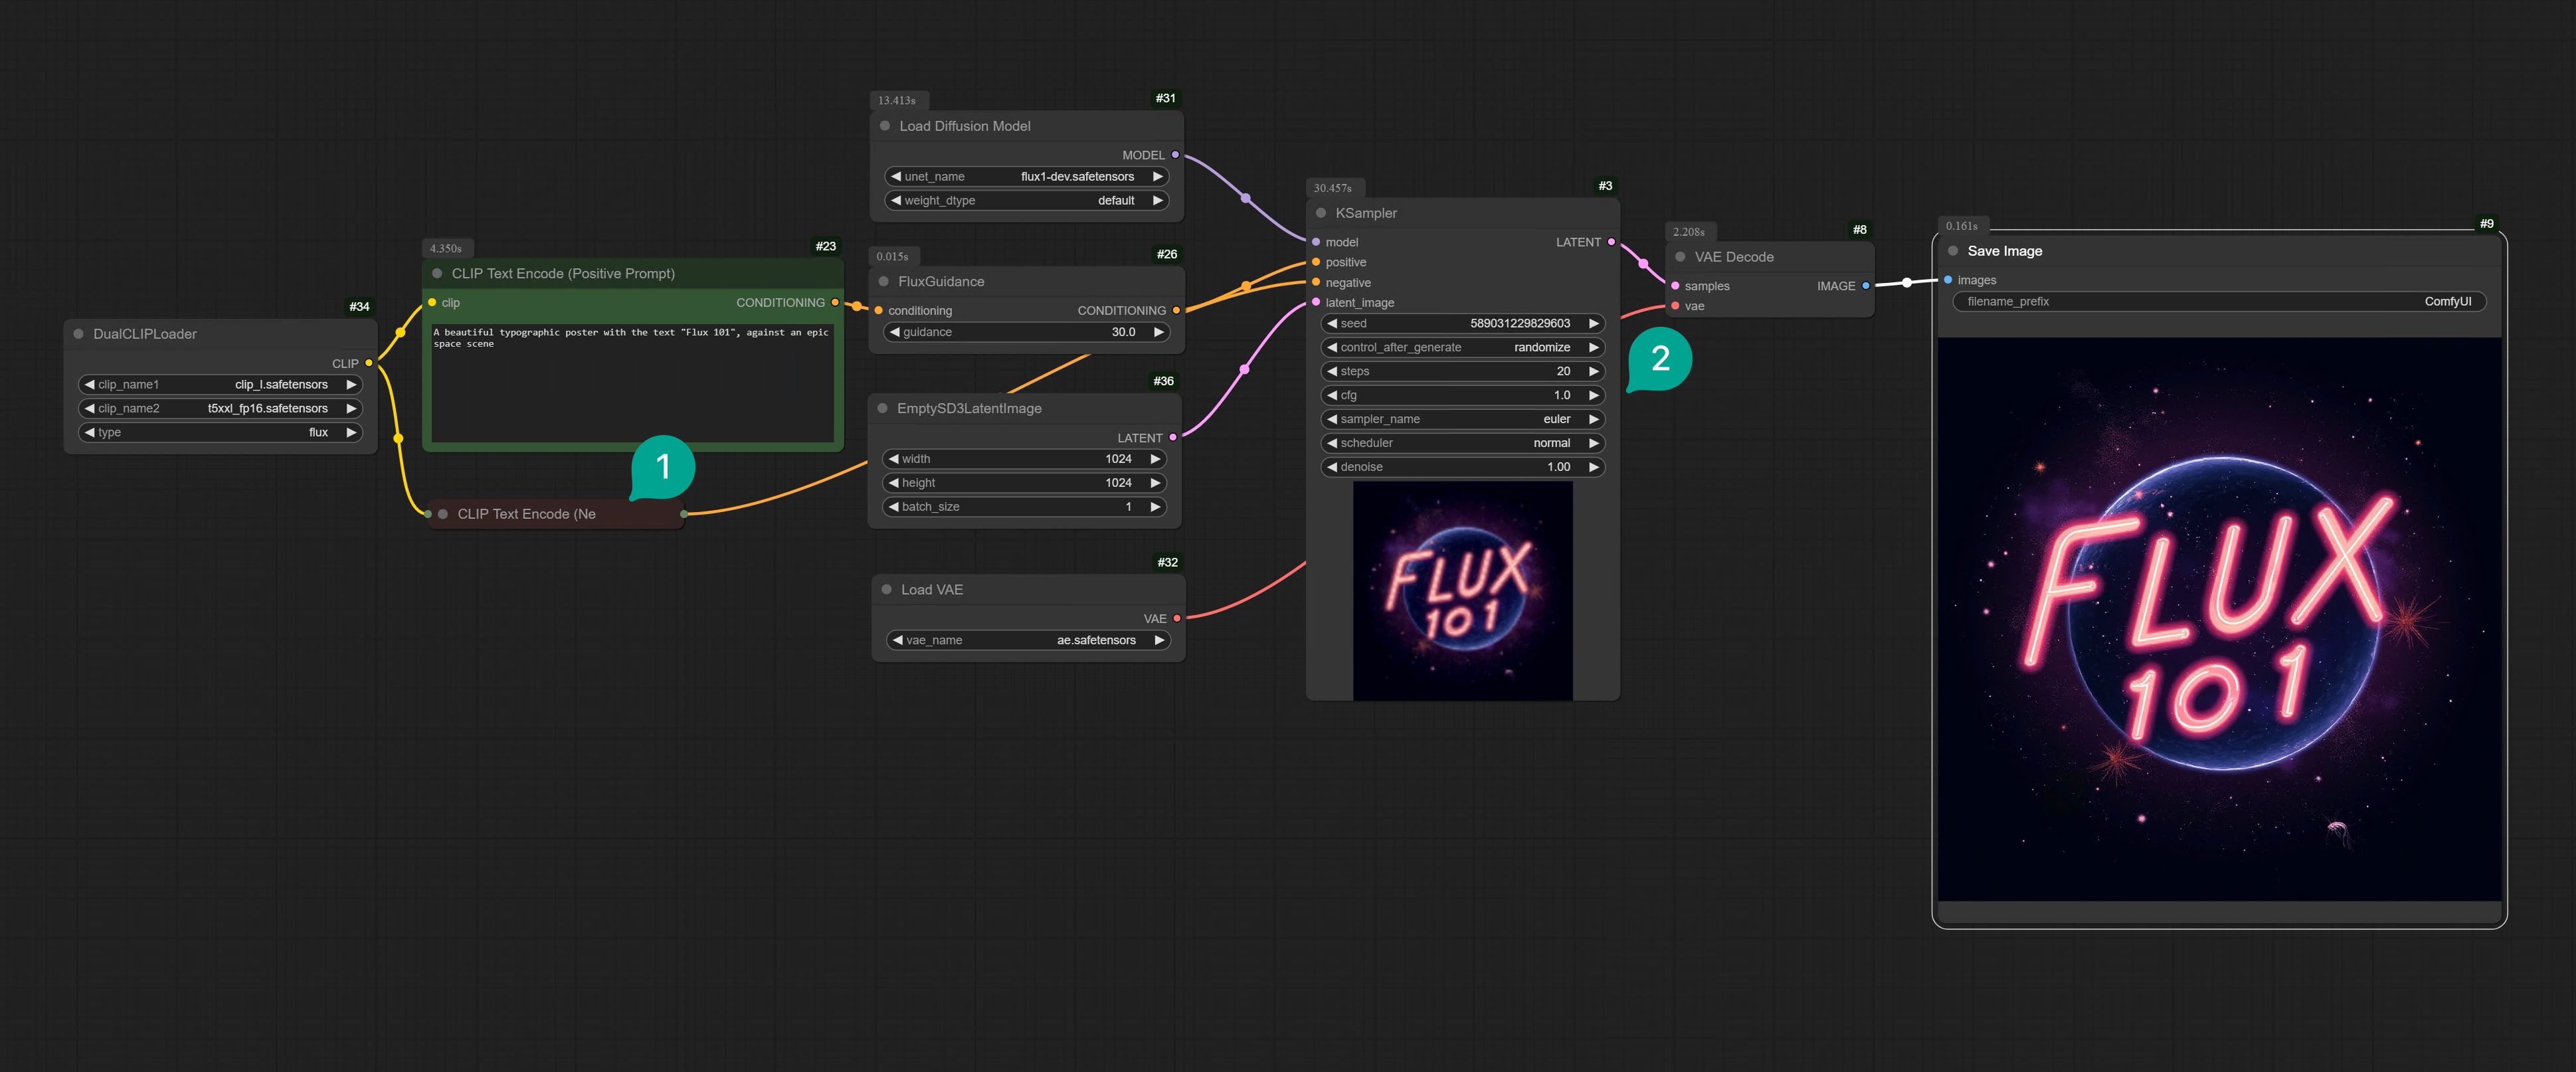
| Figure | Description |
|---|---|
| ① | Because Flux does not have a Negative Prompt, you can fold the Negative Prompt node. |
| ② | Because Flux is a guidance distilled model, so the CFG value will not take effect, you need to set it to 1. |
Flux Dev App
Use this application, generating a single image only takes 8s.
Flux ComfyUI Template
Click the Remix button in the upper right corner to enter the workflow mode.
2. FP8 version of Flux
2.1 Download Flux Checkpoint Model
You can click here to download the Flux Dev FP8 Checkpoint model. Downloaded model needs to be placed in the/models/checkpoints/ directory of ComfyUI.
2.2 Configure ComfyUI workflow
You can refer to the following screenshot to connect the nodes yourself. This version is actually a more simplified version of the version I recommended above, replacing the Diffusion Model, DualCLIPLoader, and VAE nodes with the Checkpoint Loader node.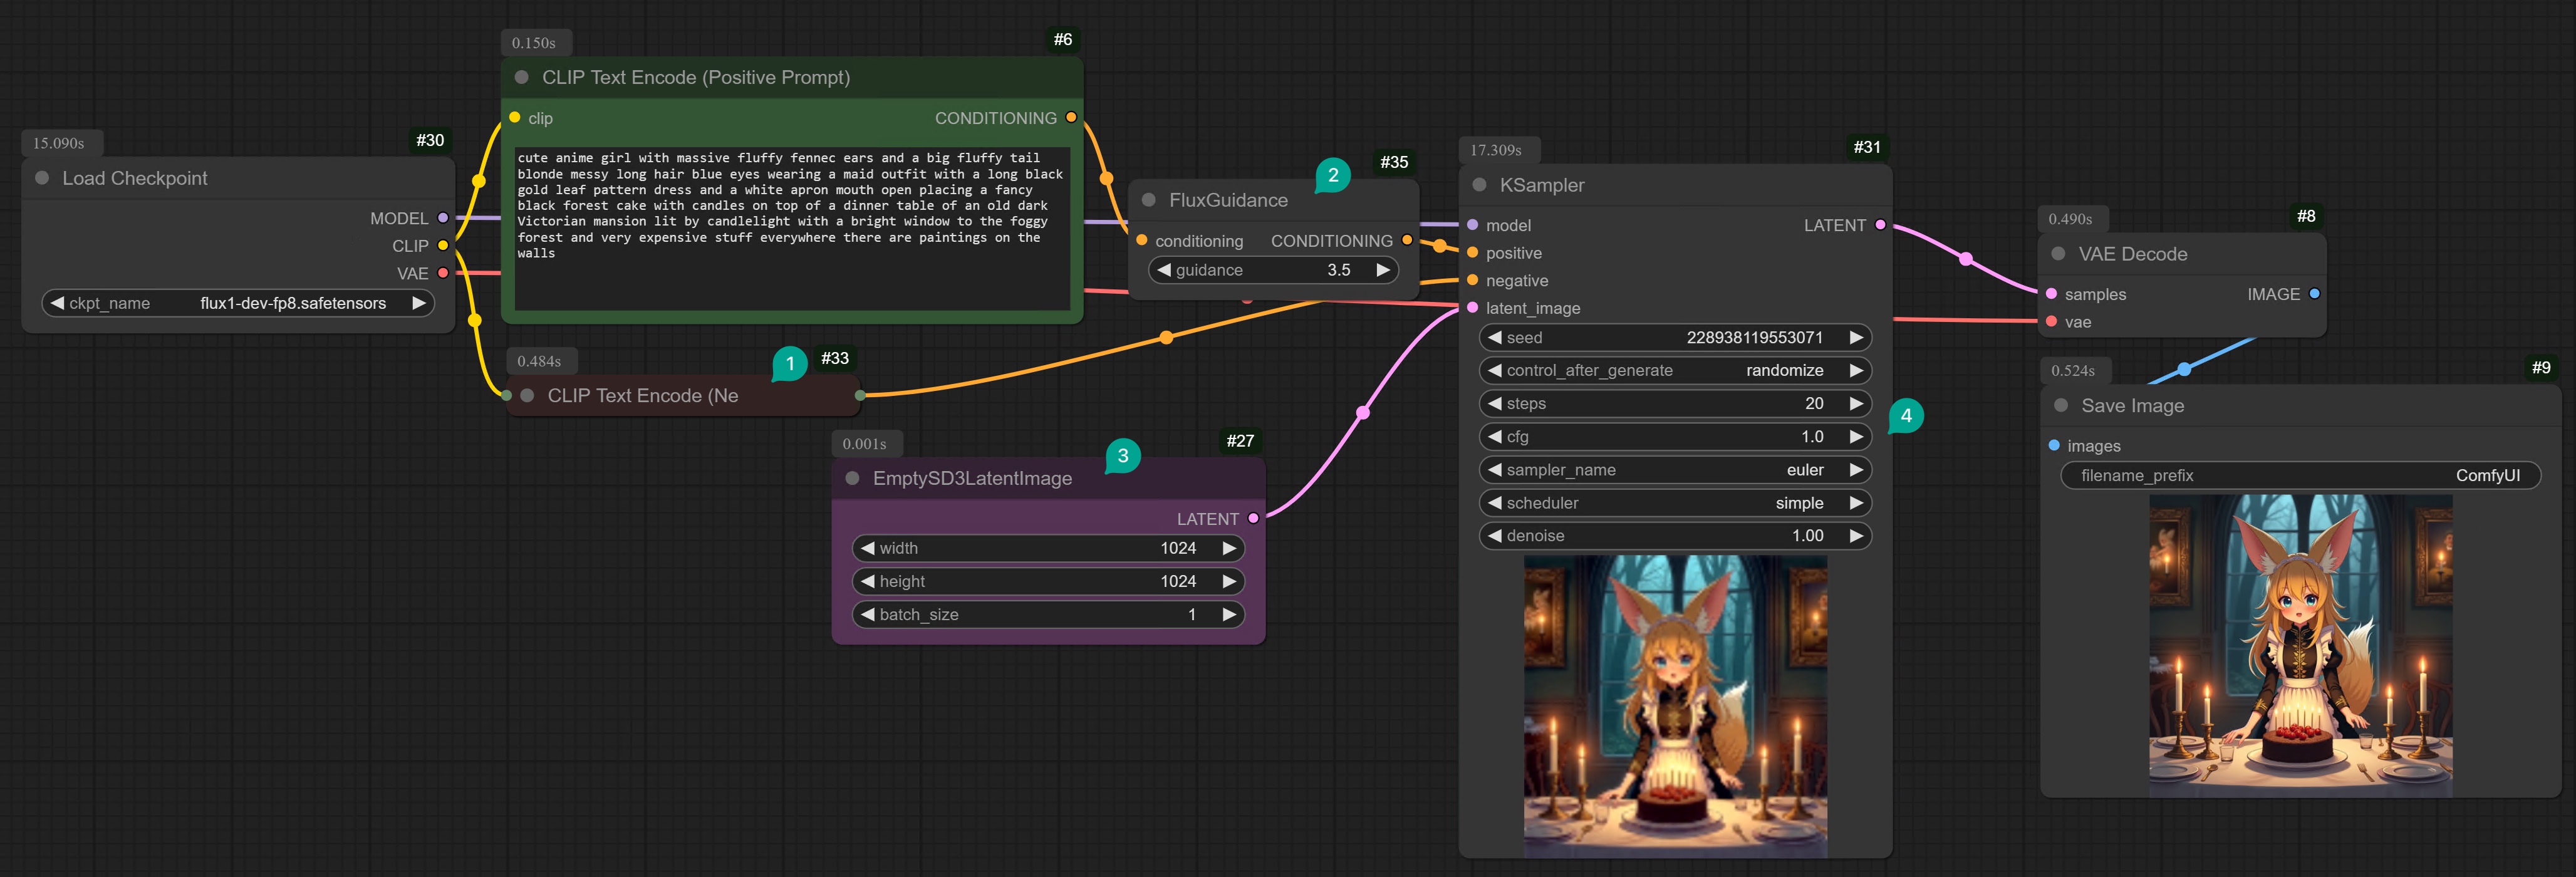
| Figure | Description |
|---|---|
| ① | Because the Negative Prompt node is no longer effective, you can fold it. |
| ② | Added a Guidance node. You can set the Guidance value from 0 to 100. The effect of this value is very subtle. You need to test it with different prompts. If you find that the image generated is not good, you can try to adjust it. After testing: 1. Even if this value is set to 90, the generated image is still usable. So you can try it without hesitation. 2. This value only has significant effects at specific values, such as 1, the generated image will be darker. 3. The effect changes greatly between 0~4. In other words, the difference between generating images by setting this value from 0 to 4 is much greater than setting it from 10 to 60. So if you want to test more effects, you only need to test from 0 to 4. 4. If you want to generate something that is very complex and does not exist in the real world, such as “tomato with legs”, then you need to set a larger value, such as 5 or more. 5. If you don’t know what to use, set it to 3.5. |
| ③ | The EmptySD3LatentImage node is used to generate latent vectors. Although it is named SD3, it can actually be used with Flux. |
| ④ | The CFG value in the KSampler node is the same as mentioned in the previous chapter. Flux is a guidance distilled model. So the CFG value will not take effect. You need to set it to 1. |
Flux Dev App
Use this application, generating a single image only takes 8s.
Flux ComfyUI Template
Click the Remix button in the upper right corner to enter the workflow mode.
3. GGUF version Flux
3.1 Download GGUF version Flux model
You can click here to download the GGUF version Flux model. Downloaded model needs to be placed in the/models/unet directory of ComfyUI.
You will see that there are many versions of GGUF, you can choose the one that suits your computer configuration:
| Version | Description |
|---|---|
| Q8_0 | If you have 24GB of VRAM, use the Q8 version. Its output effect is almost the same as FP16. When used with other CLIP models, you will use about 15GB of VRAM. So you have more VRAM space to load multiple LoRAs, or image repair models. You can even use Q8 to load an LLM with Flux. |
| Q6_K | If you only have 16GB of VRAM, then Q6_K is perfect for you. It provides a certain accuracy with a smaller volume. When used with other CLIP models, it will occupy about 12GB of VRAM. |
| Q4_0 或 Q4_1 | If you have less than 10GB of VRAM, please use Q4_0 or Q4_1, not NF4 (personally, I think NF4 is the least predictable version in terms of image quality. Sometimes, the image is very good, and sometimes it is very bad. I think there is a consistency issue with this model). I’m not saying NF4 is bad. But if you are looking for a model that is closer to FP16, then Q4_0 is what you want. |
3.2 Configure ComfyUI workflow
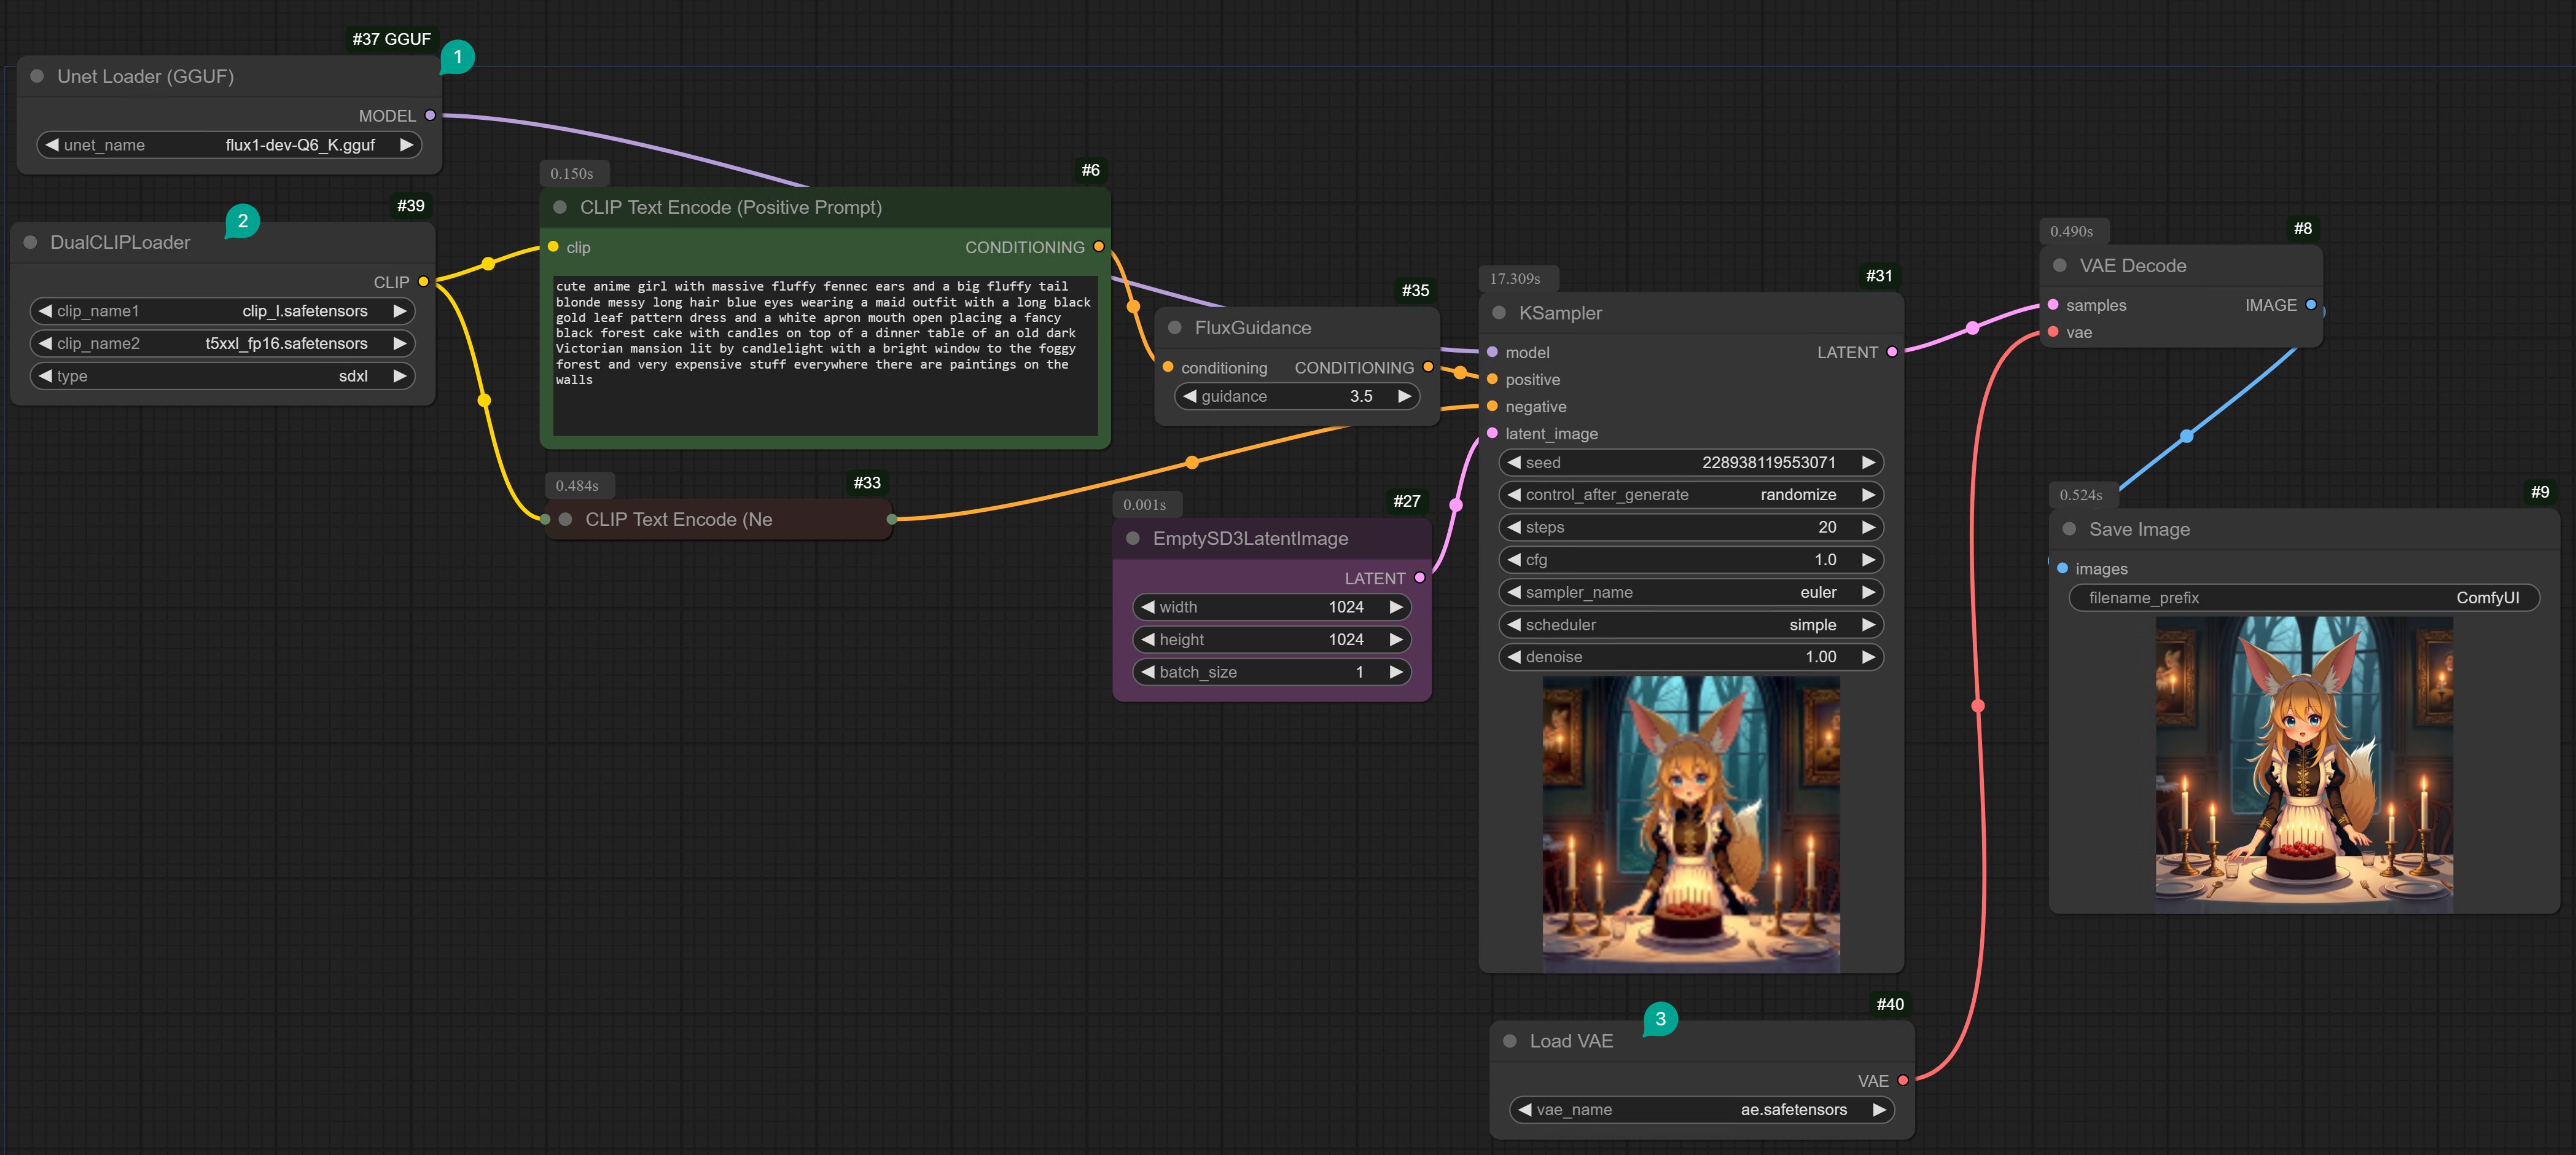
First, you need to install the ComfyUI-GGUF plugin. I won’t repeat the installation method here. You can refer to ComfyUI Extension Installation Tutorial. After installing the extension, you can connect the nodes yourself according to the following screenshot.If you don’t want to manually connect, you can go to Comflowy to use our Flux Dev application, which can generate a single image in just 8s. Or download this workflow template and import it into your local ComfyUI. (Also, if you don’t know how to download Comflowy templates, you can read this tutorial).Flux Dev App
Use this application, generating a single image only takes 8s.
Flux ComfyUI Template
Click the Remix button in the upper right corner to enter the workflow mode.
